+++
Categories = ["Clustering", "Pacemaker", "Corosync"]
Description = "Pacemaker + Corosyncを用いてクラスタ環境を構築してみました。RHEL 6.4で検証しました。今回は共有ディスクを利用できるようにします"
Tags = []
date = "2016-07-02T23:48:32+08:00"
draft = false
title = "Pacemaker + Corosyncを用いてクラスタ環境の構築 - iSCSIサーバを利用した共有ディスクの作成"
thumbnail = "images/7241213444_1c8a40e897.jpg"
+++
お仕事でLinux環境でHAクラスタを検証する必要が出てきたので、手順を調べてみました。
## 環境
RHEL 6.4環境で検証しております:
```
# cat /etc/redhat-release
Red Hat Enterprise Linux Server release 6.4 (Santiago)
```
当然ながらCentOS6でも動作するかと思います。RHEL 7 or CentOS7ではOSの仕組みが変わっていると思いますので、ここでまとめた手順の通りにしてもおそらく動作しません。
ホスト名一覧などは以下のとおりです:
| # | Hostname | IP Address | Remarks |
|:-:|:--------:|:----------:|:-------:|
| 1 | rhel-act | 192.168.56.31 | Active server |
| 2 | rhel-sta | 192.168.56.32 | Standby server |
| 3 | rhel-logical | 192.168.56.30 | Logical hostname / floating IP |
| 4 | rhel-iscsi | 192.168.56.40 | iScsi server |
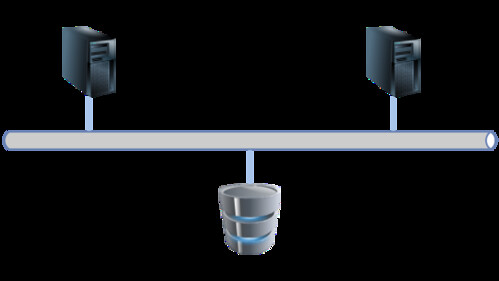
簡単なネットワーク図はこちら:
 ## iSCSIとは
[LAN接続のストレージiSCSIとは?](https://www.newtech.co.jp/topics/column/ip_san/i1/index.html)によると、以下とのことです:
> iSCSIは、SCSIコマンド、データの転送をIPに変換して通信する方式で、イーサネットのインフラが使用できるため、安価にストレージネットワークを構築でき、FC-SANのような専門知識が必要な管理者が不要です。また、距離の制限がなくなるため、よりグローバルなシステム構築が可能です。
仕組みとしてはiSCSIターゲット(共有ディスク)というものに対して、iSCSIイニシエーターが接続することで、共有ディスクを利用することができるようになります。
## 今回の作業内容
今回は`rhel-iscsi`サーバに対して、iSCSIターゲットを導入、セットアップします。
その後、`rhel-act`サーバ、`rhel-sta`サーバにiSCSIイニシエーターを導入、iSCSIターゲットに接続し、共有ディスクとして利用できることを確認します。
## iSCSIのインストール
ここでは`rhel-act`およびに`rhel-sta`からの接続を許可するiSCSIターゲットを`rhel-iscsi`上に作成します。ターゲット名は`iqn.2016-06.local.test.has:sdb`、LUNに`/dev/sdb`を割り当てます。
コマンド or 設定ファイルは設定を永続化するか、しないかによって、どちらを利用するか決めてください。
### iSCSI Targetのインストール
以下のコマンドを実行し、iSCSI Targetをインストールします:
```
# yum install -y scsi-target-utils
```
### セットアップ方法
セットアップ方法を説明します。
#### 自動起動の設定
OS起動時に自動起動するよう設定します:
```
# chkconfig --list > 003_before.txt
# chkconfig tgtd on
# chkconfig --list > 003_after.txt
# diff -u 003_before.txt 003_after.txt
--- 003_before.txt 2016-06-26 14:52:28.420010884 +0800
+++ 003_after.txt 2016-06-26 14:52:39.794971288 +0800
@@ -20,5 +20,5 @@
saslauthd 0:off 1:off 2:off 3:off 4:off 5:off 6:off
sshd 0:off 1:off 2:on 3:on 4:on 5:on 6:off
svnserve 0:off 1:off 2:off 3:off 4:off 5:off 6:off
-tgtd 0:off 1:off 2:off 3:off 4:off 5:off 6:off
+tgtd 0:off 1:off 2:on 3:on 4:on 5:on 6:off
udev-post 0:off 1:on 2:on 3:on 4:on 5:on 6:off
```
### iSCSIターゲットの作成 (コマンドによる一時的な指定)
コマンドによる一時的な指定方法を説明します。この方法を利用した場合、OS起動時に設定がリセットされます:
#### iSCSIターゲットの作成
以下のコマンドを実行し、iSCSIターゲットを作成します:
```
# tgtadm --lld iscsi --op new --mode target --tid 1 --targetname \
iqn.2016-06.local.test.has:sdb
```
#### デバイスの割当
以下のコマンドを実行し、LUN1に対してデバイスを割り当てます:
```
# tgtadm --lld iscsi --op new --mode logicalunit --tid 1 --lun 1 \
--backing-store /dev/sdb
```
#### 接続を許可するイニシエーターの設定
以下のコマンドを実行し、接続を許可するイニシエーターを指定します。ここでは`rhel-act`, `rhel-sta`に対する接続を許可します:
```
# tgtadm --lld iscsi --op bind --mode target --tid 1 \
--initiator-address 192.168.59.31
# tgtadm --lld iscsi --op bind --mode target --tid 1 \
--initiator-address 192.168.59.32
```
### iSCSIターゲットの作成 (設定ファイルによる永続的な指定)
設定ファイルを用いたセットアップ方法を以下に示します:
#### 設定ファイルの編集
以下のようにして、`/etc/tgt/config/*.conf`を設定ファイルとして参照するようにします:
```
# cd /etc/tgt/
# cp -p targets.conf targets.conf.${YYYYMMDD}
# vi targets.conf
# diff -u targets.conf.${YYYYMMDD} targets.conf
--- targets.conf.20160626 2016-01-20 01:57:37.000000000 +0800
+++ targets.conf 2016-06-26 18:29:04.971000264 +0800
@@ -6,7 +6,7 @@
# This one includes other config files:
-#include /etc/tgt/temp/*.conf
+include /etc/tgt/config/*.conf
# Set the driver. If not specified, defaults to "iscsi".
```
#### iSCSIターゲットの作成
以下のコマンドを実行し、iSCSIターゲットを作成します:
```
# mkdir config
# cd config
# vi shared.conf
# cat shared.conf
backing-store /dev/sdb
initiator-address 192.168.59.31
initiator-address 192.168.59.32
write-cache off
#incominguser iscsiuser iscsi_usr_pass
#outgoinguser iscsiserver iscsi_srv_pass
```
`tgtd`サービスを再起動し、設定を反映させます:
```
# service tgtd restart
Stopping SCSI target daemon: [ OK ]
Starting SCSI target daemon: [ OK ]
```
### iSCSIターゲットの設定確認
以下のコマンドを実行し、iSCSIターゲットの設定を確認することができます:
```
# tgtadm --lld iscsi --op show --mode target
Target 1: iqn.2016-06.local.test.has:sdb
System information:
Driver: iscsi
State: ready
I_T nexus information:
LUN information:
LUN: 0
Type: controller
SCSI ID: IET 00010000
SCSI SN: beaf10
Size: 0 MB, Block size: 1
Online: Yes
Removable media: No
Prevent removal: No
Readonly: No
Backing store type: null
Backing store path: None
Backing store flags:
LUN: 1
Type: disk
SCSI ID: IET 00010001
SCSI SN: beaf11
Size: 8590 MB, Block size: 512
Online: Yes
Removable media: No
Prevent removal: No
Readonly: No
Backing store type: rdwr
Backing store path: /dev/sdb
Backing store flags:
Account information:
ACL information:
192.168.59.31
192.168.59.32
```
### iSCSIイニシエーターのインストール
`rhel-act`, `rhel-sta`サーバ上でiSCSIイニシエーターをインストールし、iSCSIターゲットに接続できるようにします。
```
# yum install -y iscsi-initiator-utils
```
#### セットアップ方法
セットアップ方法を説明します。
後ほど`Corosync`+`Pacemaker`を導入し、そこからイニシエーターを起動するため、OS起動時の自動起動を抑制します。
```
# cd /etc/iscsi/
# cp -p iscsid.conf iscsid.conf.${YYYYMMDD}
# vi iscsid.conf
# diff -u iscsid.conf.${YYYYMMDD} iscsid.conf
--- iscsid.conf.20160626 2016-05-11 07:46:56.000000000 +0800
+++ iscsid.conf 2016-06-26 13:44:40.202000111 +0800
@@ -40,7 +40,7 @@
# node.startup = automatic
#
# To manually startup the session set to "manual". The default is automatic.
-node.startup = automatic
+node.startup = manual
# For "automatic" startup nodes, setting this to "Yes" will try logins on each
# available iface until one succeeds, and then stop. The default "No" will try
```
### iSCSIターゲットへの接続テスト
セットアップが完了したため、`rhel-act`サーバから`rhel-iscsi`サーバ上のiSCSIターゲットに接続し、共有ディスクとして利用できることを確認します。
#### iSCSIターゲットへの接続
以下のコマンドを実行し、iSCSIターゲットを探索します:
```
# iscsiadm --mode=discovery --type=sendtargets --portal=192.168.59.40 192.168.59.40:3260,1 iqn.2016-06.local.test.has:sdb
```
探索結果の確認は以下のコマンドを実行します:
```
# iscsiadm -m node
192.168.59.40:3260,1 iqn.2016-06.local.test.has:sdb
```
以下のコマンドを実行し、探索したiSCSIターゲットにログインし、デバイスとして利用できるようにします:
```
# iscsiadm -m node --targetname iqn.2016-06.local.test.has:sdb --portal 192.168.59.40:3260 --login
Logging in to [iface: default, target: iqn.2016-06.local.test.has:sdb, portal: 192.168.59.40,3260] (multiple)
Login to [iface: default, target: iqn.2016-06.local.test.has:sdb, portal: 192.168.59.40,3260] successful.
```
これにより、`/dev/sd*`としてiSCSIターゲットが認識されているはずです。私の環境では、`/dev/sdb`として認識されました。
以降では`/dev/sdb`として認識された共有ディスクをセットアップします…といっても、単純にフォーマットし、共有ディスクのマウントポイント`/share`にマウントするだけですが…
#### 共有ディスクの初回セットアップ
`/dev/sdb`として認識された共有ディスクをフォーマットし、共有ディスクのマウントポイント`/share`にマウントします。
```
# fdisk /dev/sdb
Device contains neither a valid DOS partition table, nor Sun, SGI or OSF disklabel
Building a new DOS disklabel with disk identifier 0x8e1d9842.
Changes will remain in memory only, until you decide to write them.
After that, of course, the previous content won't be recoverable.
Warning: invalid flag 0x0000 of partition table 4 will be corrected by w(rite)
WARNING: DOS-compatible mode is deprecated. It's strongly recommended to
switch off the mode (command 'c') and change display units to
sectors (command 'u').
Command (m for help): n
Command action
e extended
p primary partition (1-4)
p
Partition number (1-4): 1
First cylinder (1-8192, default 1):
Using default value 1
Last cylinder, +cylinders or +size{K,M,G} (1-8192, default 8192):
Using default value 8192
Command (m for help): t
Selected partition 1
Hex code (type L to list codes): 83
Command (m for help): w
The partition table has been altered!
Calling ioctl() to re-read partition table.
Syncing disks.
# mkfs.ext4 /dev/sdb1
mke2fs 1.41.12 (17-May-2010)
Filesystem label=
OS type: Linux
Block size=4096 (log=2)
Fragment size=4096 (log=2)
Stride=0 blocks, Stripe width=0 blocks
524288 inodes, 2097148 blocks
104857 blocks (5.00%) reserved for the super user
First data block=0
Maximum filesystem blocks=2147483648
64 block groups
32768 blocks per group, 32768 fragments per group
8192 inodes per group
Superblock backups stored on blocks:
32768, 98304, 163840, 229376, 294912, 819200, 884736, 1605632
Writing inode tables: done
Creating journal (32768 blocks): done
Writing superblocks and filesystem accounting information: done
This filesystem will be automatically checked every 36 mounts or
180 days, whichever comes first. Use tune2fs -c or -i to override.
```
共有ディスクのマウントテスト:
```
# mkdir /share
# mount /dev/sdb1 /share
# df -h
Filesystem Size Used Avail Use% Mounted on
/dev/mapper/vg_rheldev-lv_root
6.0G 1.3G 4.4G 23% /
tmpfs 372M 43M 329M 12% /dev/shm
/dev/sda1 485M 32M 428M 7% /boot
/dev/sdb1 7.9G 146M 7.4G 2% /share
```
#### iSCSIターゲットの接続解除
以下のようにしてiSCSIターゲットへの接続を解除します。
まずはアンマウント:
```
# umount /share
```
そして、iSCSIターゲットからログアウトしてあげます:
```
# iscsiadm -m node --targetname iqn.2016-06.local.test.has:sdb --portal 192.168.59.40:3260 --logout
Logging out of session [sid: 1, target: iqn.2016-06.local.test.has:sdb, portal: 192.168.59.40,3260]
Logout of [sid: 1, target: iqn.2016-06.local.test.has:sdb, portal: 192.168.59.40,3260] successful.
```
## 参考リンク
- [DiskStation Manager - ナレッジベース | Synology Inc.](https://www.synology.com/ja-jp/knowledgebase/DSM/tutorial/Virtualization/How_to_set_up_and_use_iSCSI_target_on_Linux)
- [CentOS6でのiSCSI環境構築(target+initiator) - OSSでLinuxサーバ構築](http://www.oss-d.net/iscsi/1.0)
- [CentOS 6 - iSCSIターゲットの設定 : Server World](http://www.server-world.info/query?os=CentOS_6&p=iscsi)
## iSCSIとは
[LAN接続のストレージiSCSIとは?](https://www.newtech.co.jp/topics/column/ip_san/i1/index.html)によると、以下とのことです:
> iSCSIは、SCSIコマンド、データの転送をIPに変換して通信する方式で、イーサネットのインフラが使用できるため、安価にストレージネットワークを構築でき、FC-SANのような専門知識が必要な管理者が不要です。また、距離の制限がなくなるため、よりグローバルなシステム構築が可能です。
仕組みとしてはiSCSIターゲット(共有ディスク)というものに対して、iSCSIイニシエーターが接続することで、共有ディスクを利用することができるようになります。
## 今回の作業内容
今回は`rhel-iscsi`サーバに対して、iSCSIターゲットを導入、セットアップします。
その後、`rhel-act`サーバ、`rhel-sta`サーバにiSCSIイニシエーターを導入、iSCSIターゲットに接続し、共有ディスクとして利用できることを確認します。
## iSCSIのインストール
ここでは`rhel-act`およびに`rhel-sta`からの接続を許可するiSCSIターゲットを`rhel-iscsi`上に作成します。ターゲット名は`iqn.2016-06.local.test.has:sdb`、LUNに`/dev/sdb`を割り当てます。
コマンド or 設定ファイルは設定を永続化するか、しないかによって、どちらを利用するか決めてください。
### iSCSI Targetのインストール
以下のコマンドを実行し、iSCSI Targetをインストールします:
```
# yum install -y scsi-target-utils
```
### セットアップ方法
セットアップ方法を説明します。
#### 自動起動の設定
OS起動時に自動起動するよう設定します:
```
# chkconfig --list > 003_before.txt
# chkconfig tgtd on
# chkconfig --list > 003_after.txt
# diff -u 003_before.txt 003_after.txt
--- 003_before.txt 2016-06-26 14:52:28.420010884 +0800
+++ 003_after.txt 2016-06-26 14:52:39.794971288 +0800
@@ -20,5 +20,5 @@
saslauthd 0:off 1:off 2:off 3:off 4:off 5:off 6:off
sshd 0:off 1:off 2:on 3:on 4:on 5:on 6:off
svnserve 0:off 1:off 2:off 3:off 4:off 5:off 6:off
-tgtd 0:off 1:off 2:off 3:off 4:off 5:off 6:off
+tgtd 0:off 1:off 2:on 3:on 4:on 5:on 6:off
udev-post 0:off 1:on 2:on 3:on 4:on 5:on 6:off
```
### iSCSIターゲットの作成 (コマンドによる一時的な指定)
コマンドによる一時的な指定方法を説明します。この方法を利用した場合、OS起動時に設定がリセットされます:
#### iSCSIターゲットの作成
以下のコマンドを実行し、iSCSIターゲットを作成します:
```
# tgtadm --lld iscsi --op new --mode target --tid 1 --targetname \
iqn.2016-06.local.test.has:sdb
```
#### デバイスの割当
以下のコマンドを実行し、LUN1に対してデバイスを割り当てます:
```
# tgtadm --lld iscsi --op new --mode logicalunit --tid 1 --lun 1 \
--backing-store /dev/sdb
```
#### 接続を許可するイニシエーターの設定
以下のコマンドを実行し、接続を許可するイニシエーターを指定します。ここでは`rhel-act`, `rhel-sta`に対する接続を許可します:
```
# tgtadm --lld iscsi --op bind --mode target --tid 1 \
--initiator-address 192.168.59.31
# tgtadm --lld iscsi --op bind --mode target --tid 1 \
--initiator-address 192.168.59.32
```
### iSCSIターゲットの作成 (設定ファイルによる永続的な指定)
設定ファイルを用いたセットアップ方法を以下に示します:
#### 設定ファイルの編集
以下のようにして、`/etc/tgt/config/*.conf`を設定ファイルとして参照するようにします:
```
# cd /etc/tgt/
# cp -p targets.conf targets.conf.${YYYYMMDD}
# vi targets.conf
# diff -u targets.conf.${YYYYMMDD} targets.conf
--- targets.conf.20160626 2016-01-20 01:57:37.000000000 +0800
+++ targets.conf 2016-06-26 18:29:04.971000264 +0800
@@ -6,7 +6,7 @@
# This one includes other config files:
-#include /etc/tgt/temp/*.conf
+include /etc/tgt/config/*.conf
# Set the driver. If not specified, defaults to "iscsi".
```
#### iSCSIターゲットの作成
以下のコマンドを実行し、iSCSIターゲットを作成します:
```
# mkdir config
# cd config
# vi shared.conf
# cat shared.conf
backing-store /dev/sdb
initiator-address 192.168.59.31
initiator-address 192.168.59.32
write-cache off
#incominguser iscsiuser iscsi_usr_pass
#outgoinguser iscsiserver iscsi_srv_pass
```
`tgtd`サービスを再起動し、設定を反映させます:
```
# service tgtd restart
Stopping SCSI target daemon: [ OK ]
Starting SCSI target daemon: [ OK ]
```
### iSCSIターゲットの設定確認
以下のコマンドを実行し、iSCSIターゲットの設定を確認することができます:
```
# tgtadm --lld iscsi --op show --mode target
Target 1: iqn.2016-06.local.test.has:sdb
System information:
Driver: iscsi
State: ready
I_T nexus information:
LUN information:
LUN: 0
Type: controller
SCSI ID: IET 00010000
SCSI SN: beaf10
Size: 0 MB, Block size: 1
Online: Yes
Removable media: No
Prevent removal: No
Readonly: No
Backing store type: null
Backing store path: None
Backing store flags:
LUN: 1
Type: disk
SCSI ID: IET 00010001
SCSI SN: beaf11
Size: 8590 MB, Block size: 512
Online: Yes
Removable media: No
Prevent removal: No
Readonly: No
Backing store type: rdwr
Backing store path: /dev/sdb
Backing store flags:
Account information:
ACL information:
192.168.59.31
192.168.59.32
```
### iSCSIイニシエーターのインストール
`rhel-act`, `rhel-sta`サーバ上でiSCSIイニシエーターをインストールし、iSCSIターゲットに接続できるようにします。
```
# yum install -y iscsi-initiator-utils
```
#### セットアップ方法
セットアップ方法を説明します。
後ほど`Corosync`+`Pacemaker`を導入し、そこからイニシエーターを起動するため、OS起動時の自動起動を抑制します。
```
# cd /etc/iscsi/
# cp -p iscsid.conf iscsid.conf.${YYYYMMDD}
# vi iscsid.conf
# diff -u iscsid.conf.${YYYYMMDD} iscsid.conf
--- iscsid.conf.20160626 2016-05-11 07:46:56.000000000 +0800
+++ iscsid.conf 2016-06-26 13:44:40.202000111 +0800
@@ -40,7 +40,7 @@
# node.startup = automatic
#
# To manually startup the session set to "manual". The default is automatic.
-node.startup = automatic
+node.startup = manual
# For "automatic" startup nodes, setting this to "Yes" will try logins on each
# available iface until one succeeds, and then stop. The default "No" will try
```
### iSCSIターゲットへの接続テスト
セットアップが完了したため、`rhel-act`サーバから`rhel-iscsi`サーバ上のiSCSIターゲットに接続し、共有ディスクとして利用できることを確認します。
#### iSCSIターゲットへの接続
以下のコマンドを実行し、iSCSIターゲットを探索します:
```
# iscsiadm --mode=discovery --type=sendtargets --portal=192.168.59.40 192.168.59.40:3260,1 iqn.2016-06.local.test.has:sdb
```
探索結果の確認は以下のコマンドを実行します:
```
# iscsiadm -m node
192.168.59.40:3260,1 iqn.2016-06.local.test.has:sdb
```
以下のコマンドを実行し、探索したiSCSIターゲットにログインし、デバイスとして利用できるようにします:
```
# iscsiadm -m node --targetname iqn.2016-06.local.test.has:sdb --portal 192.168.59.40:3260 --login
Logging in to [iface: default, target: iqn.2016-06.local.test.has:sdb, portal: 192.168.59.40,3260] (multiple)
Login to [iface: default, target: iqn.2016-06.local.test.has:sdb, portal: 192.168.59.40,3260] successful.
```
これにより、`/dev/sd*`としてiSCSIターゲットが認識されているはずです。私の環境では、`/dev/sdb`として認識されました。
以降では`/dev/sdb`として認識された共有ディスクをセットアップします…といっても、単純にフォーマットし、共有ディスクのマウントポイント`/share`にマウントするだけですが…
#### 共有ディスクの初回セットアップ
`/dev/sdb`として認識された共有ディスクをフォーマットし、共有ディスクのマウントポイント`/share`にマウントします。
```
# fdisk /dev/sdb
Device contains neither a valid DOS partition table, nor Sun, SGI or OSF disklabel
Building a new DOS disklabel with disk identifier 0x8e1d9842.
Changes will remain in memory only, until you decide to write them.
After that, of course, the previous content won't be recoverable.
Warning: invalid flag 0x0000 of partition table 4 will be corrected by w(rite)
WARNING: DOS-compatible mode is deprecated. It's strongly recommended to
switch off the mode (command 'c') and change display units to
sectors (command 'u').
Command (m for help): n
Command action
e extended
p primary partition (1-4)
p
Partition number (1-4): 1
First cylinder (1-8192, default 1):
Using default value 1
Last cylinder, +cylinders or +size{K,M,G} (1-8192, default 8192):
Using default value 8192
Command (m for help): t
Selected partition 1
Hex code (type L to list codes): 83
Command (m for help): w
The partition table has been altered!
Calling ioctl() to re-read partition table.
Syncing disks.
# mkfs.ext4 /dev/sdb1
mke2fs 1.41.12 (17-May-2010)
Filesystem label=
OS type: Linux
Block size=4096 (log=2)
Fragment size=4096 (log=2)
Stride=0 blocks, Stripe width=0 blocks
524288 inodes, 2097148 blocks
104857 blocks (5.00%) reserved for the super user
First data block=0
Maximum filesystem blocks=2147483648
64 block groups
32768 blocks per group, 32768 fragments per group
8192 inodes per group
Superblock backups stored on blocks:
32768, 98304, 163840, 229376, 294912, 819200, 884736, 1605632
Writing inode tables: done
Creating journal (32768 blocks): done
Writing superblocks and filesystem accounting information: done
This filesystem will be automatically checked every 36 mounts or
180 days, whichever comes first. Use tune2fs -c or -i to override.
```
共有ディスクのマウントテスト:
```
# mkdir /share
# mount /dev/sdb1 /share
# df -h
Filesystem Size Used Avail Use% Mounted on
/dev/mapper/vg_rheldev-lv_root
6.0G 1.3G 4.4G 23% /
tmpfs 372M 43M 329M 12% /dev/shm
/dev/sda1 485M 32M 428M 7% /boot
/dev/sdb1 7.9G 146M 7.4G 2% /share
```
#### iSCSIターゲットの接続解除
以下のようにしてiSCSIターゲットへの接続を解除します。
まずはアンマウント:
```
# umount /share
```
そして、iSCSIターゲットからログアウトしてあげます:
```
# iscsiadm -m node --targetname iqn.2016-06.local.test.has:sdb --portal 192.168.59.40:3260 --logout
Logging out of session [sid: 1, target: iqn.2016-06.local.test.has:sdb, portal: 192.168.59.40,3260]
Logout of [sid: 1, target: iqn.2016-06.local.test.has:sdb, portal: 192.168.59.40,3260] successful.
```
## 参考リンク
- [DiskStation Manager - ナレッジベース | Synology Inc.](https://www.synology.com/ja-jp/knowledgebase/DSM/tutorial/Virtualization/How_to_set_up_and_use_iSCSI_target_on_Linux)
- [CentOS6でのiSCSI環境構築(target+initiator) - OSSでLinuxサーバ構築](http://www.oss-d.net/iscsi/1.0)
- [CentOS 6 - iSCSIターゲットの設定 : Server World](http://www.server-world.info/query?os=CentOS_6&p=iscsi)