+++
title = "democratic-csiをnomadで試してみる"
date = 2022-01-09T22:00:43+09:00
description = "nomadのCSIストレージを利用してみましたよ。democratic-csiでSynology NASを利用します"
tags = ["nomad"]
categories = ["インフラ", "HashiCorp"]
author = "kazu634"
+++
`nomad`で[democratic-csi](https://github.com/democratic-csi/democratic-csi)を利用して、`Synology`のNASから動的に`iscsi`の領域を確保して、マウントして、コンテナのストレージとして利用できるようにしてみました。ノードを跨いで、ステートを保持できるようになるよ。
## モチベーション
`Kubernetes`や`nomad`のようなコンテナオーケストレーションツールを利用している際に、ストレージをどのように手配するかというのは大きなポイントです。これがお金を払ったサービスなどであれば、自動的にストレージをアタッチしてくれたりもするのでしょうが、お家検証ラボ環境ではそんな便利な仕組みは利用できません。。
このため、勢い`nomad` はステートレスなアプリを動かすために利用していました。もしくは外部にDBなどを立てて、そこにステートを保管できるアプリの場合は、それで騙し騙し運用していました。
しかし、これではいかんということで、重い腰を上げて解決策を探ってみました。そこで見つけたのが、[democratic-csi](https://github.com/democratic-csi/democratic-csi)でした。
ちょうど「[おうち Kubernetes に最適な Synology 公式の CSI Driver がリリースされた話と Cloning / Snapshot feature deep dive - @amsy810's Blog](https://amsy810.hateblo.jp/entry/2021/12/01/061430)」を見つけたのがきっかけとして一番大きいです。
## 環境について
環境情報について説明します。
### ネットワーク図
ネットワーク図はこのようになります。3台のサーバーに`nomad`がインストールされていて、稼働しています:
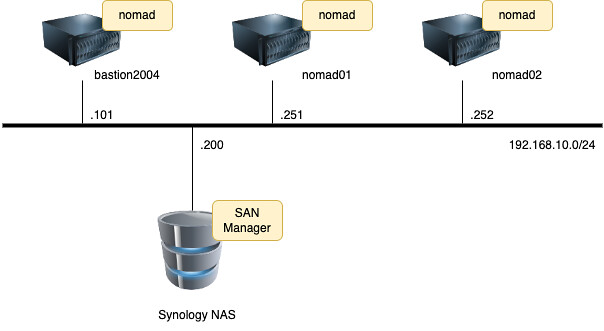 ### Synologyの環境
条件としては以下になります:
- `Synology NAS`側に`SAN Manager`が導入されていること
- `admin`アカウントが有効で、2-Factor認証は利用していないこと。パスワード認証できること
## CSIとは
CSIとは、Cloud Native Computing Foundationで定義されたContainer Orchestrator(CO)で利用可能な業界標準のストレージ・インターフェースを指しているそうです。この仕組を利用して、たとえば`Kubernetes`や`nomad`などのコンテナオーケストレーションツールがストレージを操作できるようになっているそうです。
今回は[democratic-csi](https://github.com/democratic-csi/democratic-csi)というのを利用して、`Synology NAS`から`iSCSI`領域を切り出して、コンテナから利用できるようにします。
## 事前準備
事前にやっておく作業を書きます。正直`nomad`はこの分野では成熟していないため、色々とやる必要があります。
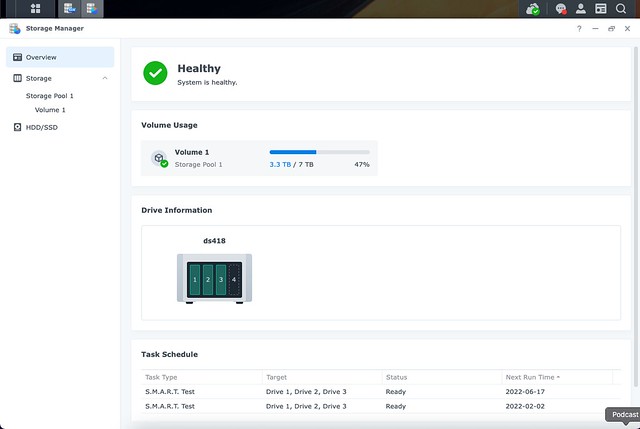
### Synology NAS側
`Storage Manager`上で、`Volume 1`がある前提で話を進めていきます:
### Synologyの環境
条件としては以下になります:
- `Synology NAS`側に`SAN Manager`が導入されていること
- `admin`アカウントが有効で、2-Factor認証は利用していないこと。パスワード認証できること
## CSIとは
CSIとは、Cloud Native Computing Foundationで定義されたContainer Orchestrator(CO)で利用可能な業界標準のストレージ・インターフェースを指しているそうです。この仕組を利用して、たとえば`Kubernetes`や`nomad`などのコンテナオーケストレーションツールがストレージを操作できるようになっているそうです。
今回は[democratic-csi](https://github.com/democratic-csi/democratic-csi)というのを利用して、`Synology NAS`から`iSCSI`領域を切り出して、コンテナから利用できるようにします。
## 事前準備
事前にやっておく作業を書きます。正直`nomad`はこの分野では成熟していないため、色々とやる必要があります。
### Synology NAS側
`Storage Manager`上で、`Volume 1`がある前提で話を進めていきます:
 また、`SAN Manager`が動作していることも確認しておきます:
 ### nomadが稼働しているサーバー側
`nomad`が動作しているサーバ側で実施する手順になります。
#### 必要なパッケージのインストール
次のようにして必要なパッケージをインストールします:
- `open-iscsi`
- `lsscsi`
- `sg3-utils`
- `multipath-tools`
- `scsitools`
実行ログはこんな感じです:
```bash
kazu634@test02% sudo apt-get install -y open-iscsi lsscsi sg3-utils multipath-tools scsitools
[sudo] kazu634 のパスワード:
パッケージリストを読み込んでいます... 完了
依存関係ツリーを作成しています
状態情報を読み取っています... 完了
multipath-tools はすでに最新バージョン (0.8.3-1ubuntu2) です。
multipath-tools は手動でインストールしたと設定されました。
sg3-utils はすでに最新バージョン (1.44-1ubuntu2) です。
sg3-utils は手動でインストールしたと設定されました。
open-iscsi はすでに最新バージョン (2.0.874-7.1ubuntu6.2) です。
open-iscsi は手動でインストールしたと設定されました。
以下のパッケージが新たにインストールされます:
lsscsi scsitools
アップグレード: 0 個、新規インストール: 2 個、削除: 0 個、保留: 0 個。
163 kB のアーカイブを取得する必要があります。
この操作後に追加で 490 kB のディスク容量が消費されます。
取得:1 http://192.168.10.200:8080/ubuntu/apt-mirror/mirror/jp.archive.ubuntu.com/ubuntu focal/main amd64
lsscsi amd64 0.30-0.1 [46.1 kB]
取得:2 http://192.168.10.200:8080/ubuntu/apt-mirror/mirror/jp.archive.ubuntu.com/ubuntu focal/universe a
md64 scsitools amd64 0.12-3ubuntu1 [117 kB]
163 kB を 0秒 で取得しました (620 kB/s)
以前に未選択のパッケージ lsscsi を選択しています。
(データベースを読み込んでいますi... 現在 81800 個のファイルとディレクトリがインストールされています。)
.../lsscsi_0.30-0.1_amd64.deb を展開する準備をしています ...
lsscsi (0.30-0.1) を展開しています...
以前に未選択のパッケージ scsitools を選択しています。
.../scsitools_0.12-3ubuntu1_amd64.deb を展開する準備をしています ...
scsitools (0.12-3ubuntu1) を展開しています...
scsitools (0.12-3ubuntu1) を設定しています ...
update-rc.d: warning: start and stop actions are no longer supported; falling back to defaults
update-rc.d: warning: start and stop actions are no longer supported; falling back to defaults
lsscsi (0.30-0.1) を設定しています ...
man-db (2.9.1-1) のトリガを処理しています ...
systemd (245.4-4ubuntu3.13) のトリガを処理しています ...
```
#### iscsiターゲットの探索
[Ubuntuでopen-iscsi(2.0.874 @raspberry pi 4 / ubuntu 20.04)](https://zenn.dev/hinoaki/articles/98e5122d5e61f3757a9d)を参照して、こんな感じで探索をします:
```bash
kazu634@test02% sudo iscsiadm -m discoverydb -t st -p 192.168.10.200 --discover
192.168.10.200:3260,1 iqn.2000-01.com.synology:ds418.default-target.670eccce521
[fe80::211:32ff:fe8a:58a3]:3260,1 iqn.2000-01.com.synology:ds418.default-target.670eccce521
192.168.10.200:3260,1 iqn.2000-01.com.synology:ds418.nomad.target-mysql
[fe80::211:32ff:fe8a:58a3]:3260,1 iqn.2000-01.com.synology:ds418.nomad.target-mysql
```
このコマンドを実行しないと、`/etc/iscsi/nodes/`配下に探索した結果を格納したファイルが作成されず、後で実施する`sudo systemctl start iscsi.service`が失敗するので、必ず実行しましょう。
#### multipath-toolsの設定
次のように行います:
```bash
kazu634@test02% sudo tee /etc/multipath.conf <<-'EOF'
defaults {
user_friendly_names yes
find_multipaths yes
}
EOF
defaults {
user_friendly_names yes
find_multipaths yes
}
```
#### 諸々自動実行させます
`multipath-tools`と`open-iscsi`を自動実行させ、起動します。
##### multipath-tools
以下のようにコマンドを実行します:
```bash
kazu634@test02% sudo systemctl enable multipath-tools.service
Synchronizing state of multipath-tools.service with SysV service script with /lib/systemd/systemd-sysv-install.
Executing: /lib/systemd/systemd-sysv-install enable multipath-tools
Created symlink /etc/systemd/system/multipath-tools.service → /lib/systemd/system/multipathd.service.
Created symlink /etc/systemd/system/sysinit.target.wants/multipathd.service → /lib/systemd/system/multipathd.service.
Created symlink /etc/systemd/system/sockets.target.wants/multipathd.socket → /lib/systemd/system/multipathd.socket.
kazu634@test02% sudo service multipath-tools restart
kazu634@test02% sudo systemctl status multipath-tools.service
multipathd.service - Device-Mapper Multipath Device Controller
Loaded: loaded (/lib/systemd/system/multipathd.service; enabled; vendor preset: enabled)
Active: active (running) since Wed 2021-12-29 12:00:21 JST; 1min 26s ago
TriggeredBy: ● multipathd.socket
Process: 28848 ExecStartPre=/sbin/modprobe -a scsi_dh_alua scsi_dh_emc scsi_dh_rdac dm-multipath (c>
Main PID: 28849 (multipathd)
Status: "up"
Tasks: 7
Memory: 10.7M
CGroup: /system.slice/multipathd.service
└─28849 /sbin/multipathd -d -s
12月 29 12:01:36 test02 multipathd[28849]: sda: failed to get sysfs uid: Invalid argument
12月 29 12:01:36 test02 multipathd[28849]: sda: failed to get sgio uid: No such file or directory
12月 29 12:01:41 test02 multipathd[28849]: sda: add missing path
12月 29 12:01:41 test02 multipathd[28849]: sda: failed to get udev uid: Invalid argument
12月 29 12:01:41 test02 multipathd[28849]: sda: failed to get sysfs uid: Invalid argument
12月 29 12:01:41 test02 multipathd[28849]: sda: failed to get sgio uid: No such file or directory
12月 29 12:01:46 test02 multipathd[28849]: sda: add missing path
12月 29 12:01:46 test02 multipathd[28849]: sda: failed to get udev uid: Invalid argument
```
##### open-iscsi
以下のようにコマンドを実行します:
```bash
kazu634@test02% sudo systemctl enable open-iscsi.service
Synchronizing state of open-iscsi.service with SysV service script with /lib/systemd/systemd-sysv-install.
Executing: /lib/systemd/systemd-sysv-install enable open-iscsi
kazu634@test02% sudo service open-iscsi start
kazu634@test02% sudo systemctl status open-iscsi
● open-iscsi.service - Login to default iSCSI targets
Loaded: loaded (/lib/systemd/system/open-iscsi.service; enabled; vendor preset: enabled)
Active: active (exited) since Wed 2021-12-29 12:03:38 JST; 8s ago
Docs: man:iscsiadm(8)
man:iscsid(8)
Process: 29166 ExecStart=/sbin/iscsiadm -m node --loginall=automatic (code=exited, status=21)
Process: 29167 ExecStart=/lib/open-iscsi/activate-storage.sh (code=exited, status=0/SUCCESS)
Main PID: 29167 (code=exited, status=0/SUCCESS)
12月 29 12:03:38 test02 systemd[1]: Starting Login to default iSCSI targets...
12月 29 12:03:38 test02 iscsiadm[29166]: iscsiadm: No records found
12月 29 12:03:38 test02 systemd[1]: Finished Login to default iSCSI targets.
```
## nomadでdemocratic-csiを動かす
先ほど書いたように`nomad`のCSIサポートは成熟していないため、次のようなことを色々としてあげる必要があります。
### CNIプラグインのインストール
[democratic-csi](https://github.com/democratic-csi/democratic-csi)の`Controller`コンポーネントは`nomad`の`Bridge`ネットワークで動作させる必要があるのですが、`Bridge`ネットワークで動作させるためには、手動でCNIプラグインをインストールする必要がありました。。さらにCNIプラグインをインストールするためには、`Golang`が必要なのでした。。
#### Golangのインストール
次のようにして`Golang`をインストールします:
```bash
kazu634@test02% sudo add-apt-repository ppa:longsleep/golang-backports
Golang 1.8, 1.9, 1.10, 1.11, 1.12, 1.13, 1.14, 1.15, 1.16 and 1.17 PPA for Ubuntu
More info: https://launchpad.net/~longsleep/+archive/ubuntu/golang-backports
Press [ENTER] to continue or Ctrl-c to cancel adding it.
ヒット:1 http://192.168.10.200:8080/ubuntu/apt-mirror/mirror/jp.archive.ubuntu.com/ubuntu focal InRelease
ヒット:2 http://192.168.10.200:8080/ubuntu/apt-mirror/mirror/jp.archive.ubuntu.com/ubuntu focal-updates InRelease
ヒット:3 http://192.168.10.200:8080/ubuntu/apt-mirror/mirror/jp.archive.ubuntu.com/ubuntu focal-backports InRelease
ヒット:4 http://192.168.10.200:8080/ubuntu/apt-mirror/mirror/jp.archive.ubuntu.com/ubuntu focal-security InRelease
ヒット:5 https://download.docker.com/linux/ubuntu focal InRelease
ヒット:6 https://apt.releases.hashicorp.com focal InRelease
取得:7 https://repositories.timber.io/public/vector/deb/ubuntu focal InRelease [4,932 B]
取得:8 https://repositories.timber.io/public/vector/deb/ubuntu focal/main amd64 Packages [2,815 B]
ヒット:9 http://ppa.launchpad.net/git-core/ppa/ubuntu focal InRelease
取得:10 http://ppa.launchpad.net/longsleep/golang-backports/ubuntu focal InRelease [17.5 kB]
取得:11 http://ppa.launchpad.net/longsleep/golang-backports/ubuntu focal/main amd64 Packages [3,196 B]
取得:12 http://ppa.launchpad.net/longsleep/golang-backports/ubuntu focal/main Translation-en [1,768 B]
30.3 kB を 2秒 で取得しました (14.5 kB/s)
パッケージリストを読み込んでいます... 完了
kazu634@test02% apt update
ヒット:1 http://192.168.10.200:8080/ubuntu/apt-mirror/mirror/jp.archive.ubuntu.com/ubuntu focal InRelease
ヒット:2 http://192.168.10.200:8080/ubuntu/apt-mirror/mirror/jp.archive.ubuntu.com/ubuntu focal-updates InRelease
ヒット:3 http://192.168.10.200:8080/ubuntu/apt-mirror/mirror/jp.archive.ubuntu.com/ubuntu focal-backports InRelease
ヒット:4 http://192.168.10.200:8080/ubuntu/apt-mirror/mirror/jp.archive.ubuntu.com/ubuntu focal-security InRelease
ヒット:5 https://download.docker.com/linux/ubuntu focal InRelease
ヒット:6 https://apt.releases.hashicorp.com focal InRelease
取得:7 https://repositories.timber.io/public/vector/deb/ubuntu focal InRelease [4,932 B]
ヒット:8 http://ppa.launchpad.net/git-core/ppa/ubuntu focal InRelease
ヒット:9 http://ppa.launchpad.net/longsleep/golang-backports/ubuntu focal InRelease
4,932 B を 1秒 で取得しました (3,617 B/s)
パッケージリストを読み込んでいます... 完了
依存関係ツリーを作成しています
状態情報を読み取っています... 完了
アップグレードできるパッケージが 1 個あります。表示するには 'apt list --upgradable' を実行してください
kazu634@test02% apt install golang
パッケージリストを読み込んでいます... 完了
依存関係ツリーを作成しています
状態情報を読み取っています... 完了
以下の追加パッケージがインストールされます:
golang-1.17 golang-1.17-doc golang-1.17-go golang-1.17-src golang-doc golang-go golang-src
pkg-config
提案パッケージ:
bzr | brz mercurial subversion
以下のパッケージが新たにインストールされます:
golang golang-1.17 golang-1.17-doc golang-1.17-go golang-1.17-src golang-doc golang-go golang-src
pkg-config
アップグレード: 0 個、新規インストール: 9 個、削除: 0 個、保留: 1 個。
72.0 MB のアーカイブを取得する必要があります。
この操作後に追加で 424 MB のディスク容量が消費されます。
続行しますか? [Y/n] y
取得:1 http://192.168.10.200:8080/ubuntu/apt-mirror/mirror/jp.archive.ubuntu.com/ubuntu focal/main amd64
pkg-config amd64 0.29.1-0ubuntu4 [45.5 kB]
取得:2 http://ppa.launchpad.net/longsleep/golang-backports/ubuntu focal/main amd64 golang-1.17-doc all 1
.17.5-1longsleep1+focal [105 kB]
取得:3 http://ppa.launchpad.net/longsleep/golang-backports/ubuntu focal/main amd64 golang-1.17-src all 1
.17.5-1longsleep1+focal [15.2 MB]
取得:4 http://ppa.launchpad.net/longsleep/golang-backports/ubuntu focal/main amd64 golang-1.17-go amd64
1.17.5-1longsleep1+focal [56.6 MB]
取得:5 http://ppa.launchpad.net/longsleep/golang-backports/ubuntu focal/main amd64 golang-1.17 all 1.17.
5-1longsleep1+focal [27.9 kB]
取得:6 http://ppa.launchpad.net/longsleep/golang-backports/ubuntu focal/main amd64 golang-src amd64 2:1.
17~1longsleep1 [5,056 B]
取得:7 http://ppa.launchpad.net/longsleep/golang-backports/ubuntu focal/main amd64 golang-go amd64 2:1.1
7~1longsleep1 [24.1 kB]
取得:8 http://ppa.launchpad.net/longsleep/golang-backports/ubuntu focal/main amd64 golang-doc all 2:1.17
~1longsleep1 [5,052 B]
取得:9 http://ppa.launchpad.net/longsleep/golang-backports/ubuntu focal/main amd64 golang amd64 2:1.17~1
longsleep1 [5,008 B]
72.0 MB を 15秒 で取得しました (4,900 kB/s)
以前に未選択のパッケージ golang-1.17-doc を選択しています。
(データベースを読み込んでいます .1. 現在c81861 個のファイルとディレクトリがインストールされています。)
.../0-golang-1.17-doc_1.17.5-1longsleep1+focal_all.deb を展開する準備をしています ...
golang-1.17-doc (1.17.5-1longsleep1+focal) を展開しています...
以前に未選択のパッケージ golang-1.17-src を選択しています。
.../1-golang-1.17-src_1.17.5-1longsleep1+focal_all.deb を展開する準備をしています ...
golang-1.17-src (1.17.5-1longsleep1+focal) を展開しています...
以前に未選択のパッケージ golang-1.17-go を選択しています。
.../2-golang-1.17-go_1.17.5-1longsleep1+focal_amd64.deb を展開する準備をしています ...
golang-1.17-go (1.17.5-1longsleep1+focal) を展開しています...
以前に未選択のパッケージ golang-1.17 を選択しています。
.../3-golang-1.17_1.17.5-1longsleep1+focal_all.deb を展開する準備をしています ...
golang-1.17 (1.17.5-1longsleep1+focal) を展開しています...
以前に未選択のパッケージ golang-src:amd64 を選択しています
1948
.../4-golang-src_2%3a1.17~1longsleep1_amd64.deb を展開する準備をしています ...
golang-src:amd64 (2:1.17~1longsleep1) を展開しています...
以前に未選択のパッケージ golang-go を選択しています。
.../5-golang-go_2%3a1.17~1longsleep1_amd64.deb を展開する準備をしています ...
golang-go (2:1.17~1longsleep1) を展開しています...
以前に未選択のパッケージ golang-doc を選択しています。
.../6-golang-doc_2%3a1.17~1longsleep1_all.deb を展開する準備をしています ...
golang-doc (2:1.17~1longsleep1) を展開しています...
以前に未選択のパッケージ golang:amd64 を選択しています。
.../7-golang_2%3a1.17~1longsleep1_amd64.deb を展開する準備をしています ...
golang:amd64 (2:1.17~1longsleep1) を展開しています...
以前に未選択のパッケージ pkg-config を選択しています。
.../8-pkg-config_0.29.1-0ubuntu4_amd64.deb を展開する準備をしています ...
pkg-config (0.29.1-0ubuntu4) を展開しています...
golang-1.17-doc (1.17.5-1longsleep1+focal) を設定しています ...
golang-1.17-src (1.17.5-1longsleep1+focal) を設定しています ...
pkg-config (0.29.1-0ubuntu4) を設定しています ...
golang-1.17-go (1.17.5-1longsleep1+focal) を設定しています ...
golang-src:amd64 (2:1.17~1longsleep1) を設定しています ...
golang-go (2:1.17~1longsleep1) を設定しています ...
golang-1.17 (1.17.5-1longsleep1+focal) を設定しています ...
golang-doc (2:1.17~1longsleep1) を設定しています ...
golang:amd64 (2:1.17~1longsleep1) を設定しています ...
man-db (2.9.1-1) のトリガを処理しています ...
kazu634@test02% which go
/usr/bin/go
kazu634@test02% go version
go version go1.17.5 linux/amd64
```
#### CNIプラグインのインストール
ようやくCNIプラグインをインストールしていきます。まずはCNIプラグインをビルドします。`Makefile`などはなく、`build_linux.sh`を実行します:
```bash
kazu634@test02% git clone https://github.com/containernetworking/plugins.git
Cloning into 'plugins'...
remote: Enumerating objects: 13094, done.
remote: Counting objects: 100% (1813/1813), done.
remote: Compressing objects: 100% (1125/1125), done.
remote: Total 13094 (delta 780), reused 1431 (delta 621), pack-reused 11281
Receiving objects: 100% (13094/13094), 10.98 MiB | 9.59 MiB/s, done.
Resolving deltas: 100% (6885/6885), done.
kazu634@test02% cd plugins/
kazu634@test02% ./build_linux.sh
Building plugins
bandwidth
firewall
portmap
sbr
tuning
vrf
bridge
host-device
ipvlan
loopback
macvlan
ptp
vlan
dhcp
host-local
static
kazu634@test02% ll bin/
合計 63M
drwxrwxr-x 2 kazu634 kazu634 4.0K 12月 29 12:15 .
drwxrwxr-x 10 kazu634 kazu634 4.0K 12月 29 12:15 ..
-rwxrwxr-x 1 kazu634 kazu634 3.7M 12月 29 12:15 bandwidth
-rwxrwxr-x 1 kazu634 kazu634 4.1M 12月 29 12:15 bridge
-rwxrwxr-x 1 kazu634 kazu634 9.4M 12月 29 12:15 dhcp
-rwxrwxr-x 1 kazu634 kazu634 4.2M 12月 29 12:15 firewall
-rwxrwxr-x 1 kazu634 kazu634 3.7M 12月 29 12:15 host-device
-rwxrwxr-x 1 kazu634 kazu634 3.2M 12月 29 12:15 host-local
-rwxrwxr-x 1 kazu634 kazu634 3.9M 12月 29 12:15 ipvlan
-rwxrwxr-x 1 kazu634 kazu634 3.2M 12月 29 12:15 loopback
-rwxrwxr-x 1 kazu634 kazu634 3.9M 12月 29 12:15 macvlan
-rwxrwxr-x 1 kazu634 kazu634 3.6M 12月 29 12:15 portmap
-rwxrwxr-x 1 kazu634 kazu634 4.0M 12月 29 12:15 ptp
-rwxrwxr-x 1 kazu634 kazu634 3.4M 12月 29 12:15 sbr
-rwxrwxr-x 1 kazu634 kazu634 2.8M 12月 29 12:15 static
-rwxrwxr-x 1 kazu634 kazu634 3.4M 12月 29 12:15 tuning
-rwxrwxr-x 1 kazu634 kazu634 3.8M 12月 29 12:15 vlan
-rwxrwxr-x 1 kazu634 kazu634 3.4M 12月 29 12:15 vrf
```
ビルドしたコマンドを任意のディレクトリに格納します。今回は`/opt/cni/bin`としました:
```bash
kazu634@test02% cd bin/
./ bandwidth* dhcp* host-device* ipvlan* macvlan* ptp* static* vlan*
../ bridge* firewall* host-local* loopback* portmap* sbr* tuning* vrf*
kazu634@test02% sudo chown root:root *
kazu634@test02% ll
合計 63M
drwxrwxr-x 2 kazu634 kazu634 4.0K 12月 29 12:15 .
drwxrwxr-x 10 kazu634 kazu634 4.0K 12月 29 12:15 ..
-rwxrwxr-x 1 root root 3.7M 12月 29 12:15 bandwidth
-rwxrwxr-x 1 root root 4.1M 12月 29 12:15 bridge
-rwxrwxr-x 1 root root 9.4M 12月 29 12:15 dhcp
-rwxrwxr-x 1 root root 4.2M 12月 29 12:15 firewall
-rwxrwxr-x 1 root root 3.7M 12月 29 12:15 host-device
-rwxrwxr-x 1 root root 3.2M 12月 29 12:15 host-local
-rwxrwxr-x 1 root root 3.9M 12月 29 12:15 ipvlan
-rwxrwxr-x 1 root root 3.2M 12月 29 12:15 loopback
-rwxrwxr-x 1 root root 3.9M 12月 29 12:15 macvlan
-rwxrwxr-x 1 root root 3.6M 12月 29 12:15 portmap
-rwxrwxr-x 1 root root 4.0M 12月 29 12:15 ptp
-rwxrwxr-x 1 root root 3.4M 12月 29 12:15 sbr
-rwxrwxr-x 1 root root 2.8M 12月 29 12:15 static
-rwxrwxr-x 1 root root 3.4M 12月 29 12:15 tuning
-rwxrwxr-x 1 root root 3.8M 12月 29 12:15 vlan
-rwxrwxr-x 1 root root 3.4M 12月 29 12:15 vrf
kazu634@test02% sudo mkdir -p /opt/cni/bin/
kazu634@test02% sudo mv * /opt/cni/bin/
kazu634@test02% ll /opt/cni/bin/
合計 63M
drwxr-xr-x 2 root root 4.0K 12月 29 12:18 .
drwxr-xr-x 3 root root 4.0K 12月 29 12:18 ..
-rwxrwxr-x 1 root root 3.7M 12月 29 12:15 bandwidth
-rwxrwxr-x 1 root root 4.1M 12月 29 12:15 bridge
-rwxrwxr-x 1 root root 9.4M 12月 29 12:15 dhcp
-rwxrwxr-x 1 root root 4.2M 12月 29 12:15 firewall
-rwxrwxr-x 1 root root 3.7M 12月 29 12:15 host-device
-rwxrwxr-x 1 root root 3.2M 12月 29 12:15 host-local
-rwxrwxr-x 1 root root 3.9M 12月 29 12:15 ipvlan
-rwxrwxr-x 1 root root 3.2M 12月 29 12:15 loopback
-rwxrwxr-x 1 root root 3.9M 12月 29 12:15 macvlan
-rwxrwxr-x 1 root root 3.6M 12月 29 12:15 portmap
-rwxrwxr-x 1 root root 4.0M 12月 29 12:15 ptp
-rwxrwxr-x 1 root root 3.4M 12月 29 12:15 sbr
-rwxrwxr-x 1 root root 2.8M 12月 29 12:15 static
-rwxrwxr-x 1 root root 3.4M 12月 29 12:15 tuning
-rwxrwxr-x 1 root root 3.8M 12月 29 12:15 vlan
-rwxrwxr-x 1 root root 3.4M 12月 29 12:15 vrf
```
#### CNIプラグインのセットアップ
以下の内容で`/etc/cni/nomad.conflist`というファイル名で保存します。拡張子は必ず`.conflist` にしましょう。`nomad`は拡張子`.conflist`を読み込みます:
```json
{
"cniVersion": "0.3.1",
"name": "nomad",
"plugins": [
{
"type": "ptp",
"ipMasq": true,
"ipam": {
"type": "host-local",
"subnet": "172.16.30.0/24",
"routes": [
{
"dst": "0.0.0.0/0"
}
]
}
},
{
"type": "portmap",
"capabilities": { "portMappings": true }
}
]
}
```
#### NomadからCNIプラグインを利用する
`nomad`の設定ファイルに以下の記述を追加します:
```
client {
enabled = true
cni_path = "/opt/cni/bin"
cni_config_dir = "/etc/cni/"
}
```
### CSIプラグインを動作させるためのnomadの設定
`/etc/nomad.d/csi.hcl`に以下の内容を書き込みます:
```
plugin "docker" {
config {
volumes {
enabled = true
}
allow_privileged = true
}
}
```
設定を反映させるために、`nomad`の再起動を忘れずに。以上の作業を`noamd`サーバ3台で実施します。
### domocratic-csiのControllerの起動
CSIプラグインのまずはControllerを起動させます。ここからは`nomad`のジョブ定義となります。[Nomad Support](https://github.com/democratic-csi/democratic-csi/blob/master/docs/nomad.md)を参考にしていきます。ただ、個々の記述も最新の記述とは言えず、試行錯誤したのはここだけの話。Synology NASで動作させるためには、[democratic-csi/docs/Nomad/examples](https://github.com/democratic-csi/democratic-csi/tree/master/docs/Nomad/examples)も合わせて読む必要がありました。
```
job "storage-controller" {
datacenters = ["dc1"]
type = "service"
group "controller" {
network {
mode = "bridge"
port "grpc" {
static = 9000
to = 9000
}
}
task "controller" {
driver = "docker"
config {
image = "democraticcsi/democratic-csi:latest"
ports = ["grpc"]
args = [
"--csi-version=1.2.0",
"--csi-name=org.democratic-csi.iscsi",
"--driver-config-file=${NOMAD_TASK_DIR}/driver-config-file.yaml",
"--log-level=debug",
"--csi-mode=controller",
"--server-socket=/csi/csi.sock",
"--server-address=0.0.0.0",
"--server-port=9000",
]
}
csi_plugin {
id = "org.democratic-csi.iscsi"
type = "controller"
mount_dir = "/csi"
}
template {
destination = "${NOMAD_TASK_DIR}/driver-config-file.yaml"
data = < 2021-12-29T14:22:33+09:00: Monitoring evaluation "bbb4d4af"
2021-12-29T14:22:33+09:00: Evaluation triggered by job "storage-controller"
==> 2021-12-29T14:22:34+09:00: Monitoring evaluation "bbb4d4af"
2021-12-29T14:22:34+09:00: Evaluation within deployment: "b8269ab5"
2021-12-29T14:22:34+09:00: Allocation "a9500c24" created: node "84bb93d7", group "controller"
2021-12-29T14:22:34+09:00: Evaluation status changed: "pending" -> "complete"
==> 2021-12-29T14:22:34+09:00: Evaluation "bbb4d4af" finished with status "complete"
==> 2021-12-29T14:22:34+09:00: Monitoring deployment "b8269ab5"
✓ Deployment "b8269ab5" successful
2021-12-29T14:23:04+09:00
ID = b8269ab5
Job ID = storage-controller
Job Version = 0
Status = successful
Description = Deployment completed successfully
Deployed
Task Group Desired Placed Healthy Unhealthy Progress Deadline
controller 1 1 1 0 2021-12-29T14:33:02+09:00
kazu634@test02% nomad job status storage-controller
ID = storage-controller
Name = storage-controller
Submit Date = 2021-12-29T14:22:33+09:00
Type = service
Priority = 50
Datacenters = dc1
Namespace = default
Status = running
Periodic = false
Parameterized = false
Summary
Task Group Queued Starting Running Failed Complete Lost
controller 0 0 1 0 0 0
Latest Deployment
ID = b8269ab5
Status = successful
Description = Deployment completed successfully
Deployed
Task Group Desired Placed Healthy Unhealthy Progress Deadline
controller 1 1 1 0 2021-12-29T14:33:02+09:00
Allocations
ID Node ID Task Group Version Desired Status Created Modified
a9500c24 84bb93d7 controller 0 run running 6m44s ago 6m14s ago
```
### domocratic-csiのnodeの起動
CSIの各ノードで動作させるジョブを起動します。ジョブ定義はこんな感じです:
```
job "storage-node" {
datacenters = ["dc1"]
type = "system"
group "node" {
task "node" {
driver = "docker"
env {
CSI_NODE_ID = "${attr.unique.hostname}"
}
config {
image = "democraticcsi/democratic-csi:latest"
args = [
"--csi-version=1.2.0",
"--csi-name=org.democratic-csi.iscsi",
"--driver-config-file=${NOMAD_TASK_DIR}/driver-config-file.yaml",
"--log-level=debug",
"--csi-mode=node",
"--server-socket=/csi/csi.sock",
]
privileged = true
ipc_mode = "host"
network_mode = "host"
mount {
type = "bind"
target = "/host"
source = "/"
readonly = false
}
}
csi_plugin {
id = "org.democratic-csi.iscsi"
type = "node"
mount_dir = "/csi"
}
template {
destination = "${NOMAD_TASK_DIR}/driver-config-file.yaml"
data = < 2021-12-29T14:24:03+09:00: Monitoring evaluation "ed30d050"
2021-12-29T14:24:03+09:00: Evaluation triggered by job "storage-node"
2021-12-29T14:24:03+09:00: Allocation "ee10d0e6" created: node "84bb93d7", group "node"
==> 2021-12-29T14:24:04+09:00: Monitoring evaluation "ed30d050"
2021-12-29T14:24:04+09:00: Evaluation status changed: "pending" -> "complete"
==> 2021-12-29T14:24:04+09:00: Evaluation "ed30d050" finished with status "complete"
kazu634@test02% nomad job status storage-node
ID = storage-node
Name = storage-node
Submit Date = 2021-12-29T14:24:03+09:00
Type = system
Priority = 50
Datacenters = dc1
Namespace = default
Status = running
Periodic = false
Parameterized = false
Summary
Task Group Queued Starting Running Failed Complete Lost
node 0 0 1 0 0 0
Allocations
ID Node ID Task Group Version Desired Status Created Modified
ee10d0e6 84bb93d7 node 0 run running 12m55s ago 12m48s ago
```
## 動作確認
[Stateful Workloads with Container Storage Interface | Nomad - HashiCorp Learn](https://learn.hashicorp.com/tutorials/nomad/stateful-workloads-csi-volumes?in=nomad/stateful-workloads)を参考にして、動作確認をしていきます。
### ストレージの作成
次のようなストレージ定義を作成します:
```
id = "mysql"
name = "mysql"
type = "csi"
plugin_id = "org.democratic-csi.iscsi"
capacity_min = "3GiB"
capacity_max = "5GiB"
capability {
access_mode = "single-node-writer"
attachment_mode = "file-system"
}
mount_options {
}
```
これを`storage-mysql.hcl`として保存し、ストレージを作成します:
```bash
kazu634@test02% nomad volume create storage-mysql.hcl
Created external volume mysql with ID mysql
```
作成したストレージを確認してみます:
```bash
kazu634@test02% nomad volume status
Container Storage Interface
ID Name Plugin ID Schedulable Access Mode
mysql mysql org.democratic-csi.iscsi true
kazu634@test02% nomad volume status mysql
ID = mysql
Name = mysql
External ID = mysql
Plugin ID = org.democratic-csi.iscsi
Provider = org.democratic-csi.iscsi
Version = 1.4.3
Schedulable = true
Controllers Healthy = 1
Controllers Expected = 1
Nodes Healthy = 1
Nodes Expected = 1
Access Mode =
Attachment Mode =
Mount Options =
Namespace = default
Allocations
No allocations placed
```
### テスト用のジョブ実行
次のジョブ定義を作成します。
```hcl
job "mysql-server" {
datacenters = ["dc1"]
type = "service"
group "mysql-server" {
count = 1
volume "mysql" {
type = "csi"
read_only = false
source = "mysql"
attachment_mode = "file-system"
access_mode = "single-node-writer"
per_alloc = false
}
network {
port "db" {
static = 3306
}
}
restart {
attempts = 10
interval = "5m"
delay = "25s"
mode = "delay"
}
task "mysql-server" {
driver = "docker"
volume_mount {
volume = "mysql"
destination = "/srv"
read_only = false
}
env {
MYSQL_ROOT_PASSWORD = "password"
}
config {
image = "hashicorp/mysql-portworx-demo:latest"
args = ["--datadir", "/srv/mysql"]
ports = ["db"]
}
resources {
cpu = 500
memory = 1024
}
service {
name = "mysql-server"
port = "db"
check {
type = "tcp"
interval = "10s"
timeout = "2s"
}
}
}
}
}
```
それではジョブを実行します:
```bash
kazu634@test02% nomad job run mysql.nomad
==> 2021-12-29T14:51:29+09:00: Monitoring evaluation "6278f054"
2021-12-29T14:51:29+09:00: Evaluation triggered by job "mysql-server"
2021-12-29T14:51:29+09:00: Evaluation within deployment: "ecf0f580"
2021-12-29T14:51:29+09:00: Evaluation status changed: "pending" -> "complete"
==> 2021-12-29T14:51:29+09:00: Evaluation "6278f054" finished with status "complete"
==> 2021-12-29T14:51:29+09:00: Monitoring deployment "ecf0f580"
✓ Deployment "ecf0f580" successful
2021-12-29T14:53:29+09:00
ID = ecf0f580
Job ID = mysql-server
Job Version = 0
Status = successful
Description = Deployment completed successfully
Deployed
Task Group Desired Placed Healthy
Unhealthy Progress Deadline
mysql-server 1 4 1 3
2021-12-29T15:03:28+09:00
kazu634@test02% nomad job status mysql-server
ID = mysql-server
Name = mysql-server
Submit Date = 2021-12-29T14:49:15+09:00
Type = service
Priority = 50
Datacenters = dc1
Namespace = default
Status = running
Periodic = false
Parameterized = false
Summary
Task Group Queued Starting Running Failed Complete Lost
mysql-server 0 0 1 3 0 0
Latest Deployment
ID = ecf0f580
Status = successful
Description = Deployment completed successfully
Deployed
Task Group Desired Placed Healthy Unhealthy Progress Deadline
mysql-server 1 4 1 3 2021-12-29T15:03:28+09:00
Allocations
ID Node ID Task Group Version Desired Status Created Modified
8eec5c5c 84bb93d7 mysql-server 0 run running 1m56s ago 1m12s ago
kazu634@test02% nomad alloc status 8eec5c5c
ID = 8eec5c5c-6010-a7e4-c766-951d24de372e
Eval ID = 2f202164
Name = mysql-server.mysql-server[0]
Node ID = 84bb93d7
Node Name = test02
Job ID = mysql-server
Job Version = 0
Client Status = running
Client Description = Tasks are running
Desired Status = run
Desired Description =
Created = 2m8s ago
Modified = 1m24s ago
Deployment ID = ecf0f580
Deployment Health = healthy
Allocation Addresses
Label Dynamic Address
*db yes 192.168.10.82:3306
Task "mysql-server" is "running"
Task Resources
CPU Memory Disk Addresses
4/500 MHz 387 MiB/1.0 GiB 300 MiB
CSI Volumes:
ID Read Only
mysql false
Task Events:
Started At = 2021-12-29T05:53:13Z
Finished At = N/A
Total Restarts = 0
Last Restart = N/A
Recent Events:
Time Type Description
2021-12-29T14:53:13+09:00 Started Task started by client
2021-12-29T14:52:49+09:00 Driver Downloading image
2021-12-29T14:52:49+09:00 Task Setup Building Task Directory
2021-12-29T14:52:45+09:00 Received Task received by client
kazu634@test02% nomad volume status mysql
ID = mysql
Name = mysql
External ID = mysql
Plugin ID = org.democratic-csi.iscsi
Provider = org.democratic-csi.iscsi
Version = 1.4.3
Schedulable = true
Controllers Healthy = 1
Controllers Expected = 1
Nodes Healthy = 1
Nodes Expected = 1
Access Mode = single-node-writer
Attachment Mode = file-system
Mount Options =
Namespace = default
Allocations
ID Node ID Task Group Version Desir
ed Status Created Modified
8eec5c5c-6010-a7e4-c766-951d24de372e 84bb93d7-df8f-7376-3247-88e01498f1a9 mysql-server 0 run
running 2m19s ago 1m35s ago
```
うまく起動しない場合は、`/etc/iscsi/nodes/`配下を全て削除して、再度ジョブを実行してください。
うまく起動できたら、初期データの確認とデータの書き込みをします:
```bash
kazu634@test02% mysql -h 192.168.10.82 -u web -p -D i
temcollection
Enter password:
Reading table information for completion of table and column names
You can turn off this feature to get a quicker startup with -A
Welcome to the MySQL monitor. Commands end with ; or \g.
Your MySQL connection id is 50
Server version: 8.0.15 MySQL Community Server - GPL
Copyright (c) 2000, 2021, Oracle and/or its affiliates.
Oracle is a registered trademark of Oracle Corporation and/or its
affiliates. Other names may be trademarks of their respective
owners.
Type 'help;' or '\h' for help. Type '\c' to clear the current input statement.
mysql> show tables;
+--------------------------+
| Tables_in_itemcollection |
+--------------------------+
| items |
+--------------------------+
1 row in set (0.00 sec)
mysql> select * from items;
+----+----------+
| id | name |
+----+----------+
| 1 | bike |
| 2 | baseball |
| 3 | chair |
+----+----------+
3 rows in set (0.00 sec)
mysql> INSERT INTO items (name) VALUES ('glove');
Query OK, 1 row affected (0.03 sec)
mysql> select * from items;
+----+----------+
| id | name |
+----+----------+
| 1 | bike |
| 2 | baseball |
| 3 | chair |
| 4 | glove |
+----+----------+
4 rows in set (0.00 sec)
mysql> INSERT INTO items (name) VALUES ('hat');
Query OK, 1 row affected (0.01 sec)
mysql> INSERT INTO items (name) VALUES ('keyboard')
Query OK, 1 row affected (0.00 sec)
mysql> exit
Bye
```
ここでこのジョブを停止してみます:
```bash
kazu634@test02% nomad job stop -purge mysql-server
==> 2021-12-29T15:04:01+09:00: Monitoring evaluation "c30547e6"
2021-12-29T15:04:01+09:00: Evaluation triggered by job "mysql-server"
==> 2021-12-29T15:04:02+09:00: Monitoring evaluation "c30547e6"
2021-12-29T15:04:02+09:00: Evaluation within deployment: "ecf0f580"
2021-12-29T15:04:02+09:00: Evaluation status changed: "pending" -> "complete"
==> 2021-12-29T15:04:02+09:00: Evaluation "c30547e6" finished with status "complete"
==> 2021-12-29T15:04:02+09:00: Monitoring deployment "ecf0f580"
✓ Deployment "ecf0f580" successful
2021-12-29T15:04:02+09:00
ID = ecf0f580
Job ID = mysql-server
Job Version = 0
Status = successful
Description = Deployment completed successfully
Deployed
Task Group Desired Placed Healthy
Unhealthy Progress Deadline
mysql-server 1 4 1 3
2021-12-29T15:03:28+09:00
kazu634@test02% nomad job status mysql-server
No job(s) with prefix or id "mysql-server" found
```
再度このジョブを起動します:
```bash
kazu634@test02% nomad job run mysql.nomad
==> 2021-12-29T15:04:17+09:00: Monitoring evaluation "76147cde"
2021-12-29T15:04:17+09:00: Evaluation triggered by job "mysql-server"
2021-12-29T15:04:17+09:00: Allocation "ba132b91" created: node "84bb93d7", group "mysql-server"
==> 2021-12-29T15:04:18+09:00: Monitoring evaluation "76147cde"
2021-12-29T15:04:18+09:00: Evaluation within deployment: "2b5617ef"
2021-12-29T15:04:18+09:00: Evaluation status changed: "pending" -> "complete"
==> 2021-12-29T15:04:18+09:00: Evaluation "76147cde" finished with status "complete"
==> 2021-12-29T15:04:18+09:00: Monitoring deployment "2b5617ef"
✓ Deployment "2b5617ef" successful
2021-12-29T15:04:45+09:00
ID = 2b5617ef
Job ID = mysql-server
Job Version = 0
Status = successful
Description = Deployment completed successfully
Deployed
Task Group Desired Placed Healthy
Unhealthy Progress Deadline
mysql-server 1 1 1 0
2021-12-29T15:14:44+09:00
```
再度、`mysql`に接続すると、データが永続化されていることがわかります (`glove`, `hat`, `keyboard`が存在します):
```
kazu634@test02% mysql -h 192.168.10.82 -u web -p -D itemcollection
Enter password:
Reading table information for completion of table and column names
You can turn off this feature to get a quicker startup with -A
Welcome to the MySQL monitor. Commands end with ; or \g.
Your MySQL connection id is 11
Server version: 8.0.15 MySQL Community Server - GPL
Copyright (c) 2000, 2021, Oracle and/or its affiliates.
Oracle is a registered trademark of Oracle Corporation and/or its
affiliates. Other names may be trademarks of their respective
owners.
Type 'help;' or '\h' for help. Type '\c' to clear the current input statement.
mysql> select * from items;
+----+----------+
| id | name |
+----+----------+
| 1 | bike |
| 2 | baseball |
| 3 | chair |
| 4 | glove |
| 5 | hat |
| 6 | keyboard |
+----+----------+
6 rows in set (0.00 sec)
```
### 後片付け
以下、実行ください:
- `nomad job stop -purge mysql-server`
- `nomad volume delete mysql`
## 参考リンク
- [democratic-csi](https://github.com/democratic-csi/democratic-csi)
- [GitHub - containernetworking/plugins: Some reference and example networking plugins, maintained by the CNI team.](https://github.com/containernetworking/plugins)
- [Ubuntuでopen-iscsi(2.0.874 @raspberry pi 4 / ubuntu 20.04)](https://zenn.dev/hinoaki/articles/98e5122d5e61f3757a9d)
- [Ubuntu Linux 20.04 LTSに、Goをインストールする(+Emacs lsp-mode) - CLOVER🍀](https://kazuhira-r.hatenablog.com/entry/2020/12/19/010344)
- [Stateful Workloads with Container Storage Interface | Nomad - HashiCorp Learn](https://learn.hashicorp.com/tutorials/nomad/stateful-workloads-csi-volumes?in=nomad/stateful-workloads)
- [kubernetesで活用しているCNI PluginのIPAM動作を試す - Qiita](https://qiita.com/ttsubo/items/877641bcd0b937cb65ad)
- [network Stanza - Job Specification | Nomad by HashiCorp](https://www.nomadproject.io/docs/job-specification/network)
### nomadが稼働しているサーバー側
`nomad`が動作しているサーバ側で実施する手順になります。
#### 必要なパッケージのインストール
次のようにして必要なパッケージをインストールします:
- `open-iscsi`
- `lsscsi`
- `sg3-utils`
- `multipath-tools`
- `scsitools`
実行ログはこんな感じです:
```bash
kazu634@test02% sudo apt-get install -y open-iscsi lsscsi sg3-utils multipath-tools scsitools
[sudo] kazu634 のパスワード:
パッケージリストを読み込んでいます... 完了
依存関係ツリーを作成しています
状態情報を読み取っています... 完了
multipath-tools はすでに最新バージョン (0.8.3-1ubuntu2) です。
multipath-tools は手動でインストールしたと設定されました。
sg3-utils はすでに最新バージョン (1.44-1ubuntu2) です。
sg3-utils は手動でインストールしたと設定されました。
open-iscsi はすでに最新バージョン (2.0.874-7.1ubuntu6.2) です。
open-iscsi は手動でインストールしたと設定されました。
以下のパッケージが新たにインストールされます:
lsscsi scsitools
アップグレード: 0 個、新規インストール: 2 個、削除: 0 個、保留: 0 個。
163 kB のアーカイブを取得する必要があります。
この操作後に追加で 490 kB のディスク容量が消費されます。
取得:1 http://192.168.10.200:8080/ubuntu/apt-mirror/mirror/jp.archive.ubuntu.com/ubuntu focal/main amd64
lsscsi amd64 0.30-0.1 [46.1 kB]
取得:2 http://192.168.10.200:8080/ubuntu/apt-mirror/mirror/jp.archive.ubuntu.com/ubuntu focal/universe a
md64 scsitools amd64 0.12-3ubuntu1 [117 kB]
163 kB を 0秒 で取得しました (620 kB/s)
以前に未選択のパッケージ lsscsi を選択しています。
(データベースを読み込んでいますi... 現在 81800 個のファイルとディレクトリがインストールされています。)
.../lsscsi_0.30-0.1_amd64.deb を展開する準備をしています ...
lsscsi (0.30-0.1) を展開しています...
以前に未選択のパッケージ scsitools を選択しています。
.../scsitools_0.12-3ubuntu1_amd64.deb を展開する準備をしています ...
scsitools (0.12-3ubuntu1) を展開しています...
scsitools (0.12-3ubuntu1) を設定しています ...
update-rc.d: warning: start and stop actions are no longer supported; falling back to defaults
update-rc.d: warning: start and stop actions are no longer supported; falling back to defaults
lsscsi (0.30-0.1) を設定しています ...
man-db (2.9.1-1) のトリガを処理しています ...
systemd (245.4-4ubuntu3.13) のトリガを処理しています ...
```
#### iscsiターゲットの探索
[Ubuntuでopen-iscsi(2.0.874 @raspberry pi 4 / ubuntu 20.04)](https://zenn.dev/hinoaki/articles/98e5122d5e61f3757a9d)を参照して、こんな感じで探索をします:
```bash
kazu634@test02% sudo iscsiadm -m discoverydb -t st -p 192.168.10.200 --discover
192.168.10.200:3260,1 iqn.2000-01.com.synology:ds418.default-target.670eccce521
[fe80::211:32ff:fe8a:58a3]:3260,1 iqn.2000-01.com.synology:ds418.default-target.670eccce521
192.168.10.200:3260,1 iqn.2000-01.com.synology:ds418.nomad.target-mysql
[fe80::211:32ff:fe8a:58a3]:3260,1 iqn.2000-01.com.synology:ds418.nomad.target-mysql
```
このコマンドを実行しないと、`/etc/iscsi/nodes/`配下に探索した結果を格納したファイルが作成されず、後で実施する`sudo systemctl start iscsi.service`が失敗するので、必ず実行しましょう。
#### multipath-toolsの設定
次のように行います:
```bash
kazu634@test02% sudo tee /etc/multipath.conf <<-'EOF'
defaults {
user_friendly_names yes
find_multipaths yes
}
EOF
defaults {
user_friendly_names yes
find_multipaths yes
}
```
#### 諸々自動実行させます
`multipath-tools`と`open-iscsi`を自動実行させ、起動します。
##### multipath-tools
以下のようにコマンドを実行します:
```bash
kazu634@test02% sudo systemctl enable multipath-tools.service
Synchronizing state of multipath-tools.service with SysV service script with /lib/systemd/systemd-sysv-install.
Executing: /lib/systemd/systemd-sysv-install enable multipath-tools
Created symlink /etc/systemd/system/multipath-tools.service → /lib/systemd/system/multipathd.service.
Created symlink /etc/systemd/system/sysinit.target.wants/multipathd.service → /lib/systemd/system/multipathd.service.
Created symlink /etc/systemd/system/sockets.target.wants/multipathd.socket → /lib/systemd/system/multipathd.socket.
kazu634@test02% sudo service multipath-tools restart
kazu634@test02% sudo systemctl status multipath-tools.service
multipathd.service - Device-Mapper Multipath Device Controller
Loaded: loaded (/lib/systemd/system/multipathd.service; enabled; vendor preset: enabled)
Active: active (running) since Wed 2021-12-29 12:00:21 JST; 1min 26s ago
TriggeredBy: ● multipathd.socket
Process: 28848 ExecStartPre=/sbin/modprobe -a scsi_dh_alua scsi_dh_emc scsi_dh_rdac dm-multipath (c>
Main PID: 28849 (multipathd)
Status: "up"
Tasks: 7
Memory: 10.7M
CGroup: /system.slice/multipathd.service
└─28849 /sbin/multipathd -d -s
12月 29 12:01:36 test02 multipathd[28849]: sda: failed to get sysfs uid: Invalid argument
12月 29 12:01:36 test02 multipathd[28849]: sda: failed to get sgio uid: No such file or directory
12月 29 12:01:41 test02 multipathd[28849]: sda: add missing path
12月 29 12:01:41 test02 multipathd[28849]: sda: failed to get udev uid: Invalid argument
12月 29 12:01:41 test02 multipathd[28849]: sda: failed to get sysfs uid: Invalid argument
12月 29 12:01:41 test02 multipathd[28849]: sda: failed to get sgio uid: No such file or directory
12月 29 12:01:46 test02 multipathd[28849]: sda: add missing path
12月 29 12:01:46 test02 multipathd[28849]: sda: failed to get udev uid: Invalid argument
```
##### open-iscsi
以下のようにコマンドを実行します:
```bash
kazu634@test02% sudo systemctl enable open-iscsi.service
Synchronizing state of open-iscsi.service with SysV service script with /lib/systemd/systemd-sysv-install.
Executing: /lib/systemd/systemd-sysv-install enable open-iscsi
kazu634@test02% sudo service open-iscsi start
kazu634@test02% sudo systemctl status open-iscsi
● open-iscsi.service - Login to default iSCSI targets
Loaded: loaded (/lib/systemd/system/open-iscsi.service; enabled; vendor preset: enabled)
Active: active (exited) since Wed 2021-12-29 12:03:38 JST; 8s ago
Docs: man:iscsiadm(8)
man:iscsid(8)
Process: 29166 ExecStart=/sbin/iscsiadm -m node --loginall=automatic (code=exited, status=21)
Process: 29167 ExecStart=/lib/open-iscsi/activate-storage.sh (code=exited, status=0/SUCCESS)
Main PID: 29167 (code=exited, status=0/SUCCESS)
12月 29 12:03:38 test02 systemd[1]: Starting Login to default iSCSI targets...
12月 29 12:03:38 test02 iscsiadm[29166]: iscsiadm: No records found
12月 29 12:03:38 test02 systemd[1]: Finished Login to default iSCSI targets.
```
## nomadでdemocratic-csiを動かす
先ほど書いたように`nomad`のCSIサポートは成熟していないため、次のようなことを色々としてあげる必要があります。
### CNIプラグインのインストール
[democratic-csi](https://github.com/democratic-csi/democratic-csi)の`Controller`コンポーネントは`nomad`の`Bridge`ネットワークで動作させる必要があるのですが、`Bridge`ネットワークで動作させるためには、手動でCNIプラグインをインストールする必要がありました。。さらにCNIプラグインをインストールするためには、`Golang`が必要なのでした。。
#### Golangのインストール
次のようにして`Golang`をインストールします:
```bash
kazu634@test02% sudo add-apt-repository ppa:longsleep/golang-backports
Golang 1.8, 1.9, 1.10, 1.11, 1.12, 1.13, 1.14, 1.15, 1.16 and 1.17 PPA for Ubuntu
More info: https://launchpad.net/~longsleep/+archive/ubuntu/golang-backports
Press [ENTER] to continue or Ctrl-c to cancel adding it.
ヒット:1 http://192.168.10.200:8080/ubuntu/apt-mirror/mirror/jp.archive.ubuntu.com/ubuntu focal InRelease
ヒット:2 http://192.168.10.200:8080/ubuntu/apt-mirror/mirror/jp.archive.ubuntu.com/ubuntu focal-updates InRelease
ヒット:3 http://192.168.10.200:8080/ubuntu/apt-mirror/mirror/jp.archive.ubuntu.com/ubuntu focal-backports InRelease
ヒット:4 http://192.168.10.200:8080/ubuntu/apt-mirror/mirror/jp.archive.ubuntu.com/ubuntu focal-security InRelease
ヒット:5 https://download.docker.com/linux/ubuntu focal InRelease
ヒット:6 https://apt.releases.hashicorp.com focal InRelease
取得:7 https://repositories.timber.io/public/vector/deb/ubuntu focal InRelease [4,932 B]
取得:8 https://repositories.timber.io/public/vector/deb/ubuntu focal/main amd64 Packages [2,815 B]
ヒット:9 http://ppa.launchpad.net/git-core/ppa/ubuntu focal InRelease
取得:10 http://ppa.launchpad.net/longsleep/golang-backports/ubuntu focal InRelease [17.5 kB]
取得:11 http://ppa.launchpad.net/longsleep/golang-backports/ubuntu focal/main amd64 Packages [3,196 B]
取得:12 http://ppa.launchpad.net/longsleep/golang-backports/ubuntu focal/main Translation-en [1,768 B]
30.3 kB を 2秒 で取得しました (14.5 kB/s)
パッケージリストを読み込んでいます... 完了
kazu634@test02% apt update
ヒット:1 http://192.168.10.200:8080/ubuntu/apt-mirror/mirror/jp.archive.ubuntu.com/ubuntu focal InRelease
ヒット:2 http://192.168.10.200:8080/ubuntu/apt-mirror/mirror/jp.archive.ubuntu.com/ubuntu focal-updates InRelease
ヒット:3 http://192.168.10.200:8080/ubuntu/apt-mirror/mirror/jp.archive.ubuntu.com/ubuntu focal-backports InRelease
ヒット:4 http://192.168.10.200:8080/ubuntu/apt-mirror/mirror/jp.archive.ubuntu.com/ubuntu focal-security InRelease
ヒット:5 https://download.docker.com/linux/ubuntu focal InRelease
ヒット:6 https://apt.releases.hashicorp.com focal InRelease
取得:7 https://repositories.timber.io/public/vector/deb/ubuntu focal InRelease [4,932 B]
ヒット:8 http://ppa.launchpad.net/git-core/ppa/ubuntu focal InRelease
ヒット:9 http://ppa.launchpad.net/longsleep/golang-backports/ubuntu focal InRelease
4,932 B を 1秒 で取得しました (3,617 B/s)
パッケージリストを読み込んでいます... 完了
依存関係ツリーを作成しています
状態情報を読み取っています... 完了
アップグレードできるパッケージが 1 個あります。表示するには 'apt list --upgradable' を実行してください
kazu634@test02% apt install golang
パッケージリストを読み込んでいます... 完了
依存関係ツリーを作成しています
状態情報を読み取っています... 完了
以下の追加パッケージがインストールされます:
golang-1.17 golang-1.17-doc golang-1.17-go golang-1.17-src golang-doc golang-go golang-src
pkg-config
提案パッケージ:
bzr | brz mercurial subversion
以下のパッケージが新たにインストールされます:
golang golang-1.17 golang-1.17-doc golang-1.17-go golang-1.17-src golang-doc golang-go golang-src
pkg-config
アップグレード: 0 個、新規インストール: 9 個、削除: 0 個、保留: 1 個。
72.0 MB のアーカイブを取得する必要があります。
この操作後に追加で 424 MB のディスク容量が消費されます。
続行しますか? [Y/n] y
取得:1 http://192.168.10.200:8080/ubuntu/apt-mirror/mirror/jp.archive.ubuntu.com/ubuntu focal/main amd64
pkg-config amd64 0.29.1-0ubuntu4 [45.5 kB]
取得:2 http://ppa.launchpad.net/longsleep/golang-backports/ubuntu focal/main amd64 golang-1.17-doc all 1
.17.5-1longsleep1+focal [105 kB]
取得:3 http://ppa.launchpad.net/longsleep/golang-backports/ubuntu focal/main amd64 golang-1.17-src all 1
.17.5-1longsleep1+focal [15.2 MB]
取得:4 http://ppa.launchpad.net/longsleep/golang-backports/ubuntu focal/main amd64 golang-1.17-go amd64
1.17.5-1longsleep1+focal [56.6 MB]
取得:5 http://ppa.launchpad.net/longsleep/golang-backports/ubuntu focal/main amd64 golang-1.17 all 1.17.
5-1longsleep1+focal [27.9 kB]
取得:6 http://ppa.launchpad.net/longsleep/golang-backports/ubuntu focal/main amd64 golang-src amd64 2:1.
17~1longsleep1 [5,056 B]
取得:7 http://ppa.launchpad.net/longsleep/golang-backports/ubuntu focal/main amd64 golang-go amd64 2:1.1
7~1longsleep1 [24.1 kB]
取得:8 http://ppa.launchpad.net/longsleep/golang-backports/ubuntu focal/main amd64 golang-doc all 2:1.17
~1longsleep1 [5,052 B]
取得:9 http://ppa.launchpad.net/longsleep/golang-backports/ubuntu focal/main amd64 golang amd64 2:1.17~1
longsleep1 [5,008 B]
72.0 MB を 15秒 で取得しました (4,900 kB/s)
以前に未選択のパッケージ golang-1.17-doc を選択しています。
(データベースを読み込んでいます .1. 現在c81861 個のファイルとディレクトリがインストールされています。)
.../0-golang-1.17-doc_1.17.5-1longsleep1+focal_all.deb を展開する準備をしています ...
golang-1.17-doc (1.17.5-1longsleep1+focal) を展開しています...
以前に未選択のパッケージ golang-1.17-src を選択しています。
.../1-golang-1.17-src_1.17.5-1longsleep1+focal_all.deb を展開する準備をしています ...
golang-1.17-src (1.17.5-1longsleep1+focal) を展開しています...
以前に未選択のパッケージ golang-1.17-go を選択しています。
.../2-golang-1.17-go_1.17.5-1longsleep1+focal_amd64.deb を展開する準備をしています ...
golang-1.17-go (1.17.5-1longsleep1+focal) を展開しています...
以前に未選択のパッケージ golang-1.17 を選択しています。
.../3-golang-1.17_1.17.5-1longsleep1+focal_all.deb を展開する準備をしています ...
golang-1.17 (1.17.5-1longsleep1+focal) を展開しています...
以前に未選択のパッケージ golang-src:amd64 を選択しています
1948
.../4-golang-src_2%3a1.17~1longsleep1_amd64.deb を展開する準備をしています ...
golang-src:amd64 (2:1.17~1longsleep1) を展開しています...
以前に未選択のパッケージ golang-go を選択しています。
.../5-golang-go_2%3a1.17~1longsleep1_amd64.deb を展開する準備をしています ...
golang-go (2:1.17~1longsleep1) を展開しています...
以前に未選択のパッケージ golang-doc を選択しています。
.../6-golang-doc_2%3a1.17~1longsleep1_all.deb を展開する準備をしています ...
golang-doc (2:1.17~1longsleep1) を展開しています...
以前に未選択のパッケージ golang:amd64 を選択しています。
.../7-golang_2%3a1.17~1longsleep1_amd64.deb を展開する準備をしています ...
golang:amd64 (2:1.17~1longsleep1) を展開しています...
以前に未選択のパッケージ pkg-config を選択しています。
.../8-pkg-config_0.29.1-0ubuntu4_amd64.deb を展開する準備をしています ...
pkg-config (0.29.1-0ubuntu4) を展開しています...
golang-1.17-doc (1.17.5-1longsleep1+focal) を設定しています ...
golang-1.17-src (1.17.5-1longsleep1+focal) を設定しています ...
pkg-config (0.29.1-0ubuntu4) を設定しています ...
golang-1.17-go (1.17.5-1longsleep1+focal) を設定しています ...
golang-src:amd64 (2:1.17~1longsleep1) を設定しています ...
golang-go (2:1.17~1longsleep1) を設定しています ...
golang-1.17 (1.17.5-1longsleep1+focal) を設定しています ...
golang-doc (2:1.17~1longsleep1) を設定しています ...
golang:amd64 (2:1.17~1longsleep1) を設定しています ...
man-db (2.9.1-1) のトリガを処理しています ...
kazu634@test02% which go
/usr/bin/go
kazu634@test02% go version
go version go1.17.5 linux/amd64
```
#### CNIプラグインのインストール
ようやくCNIプラグインをインストールしていきます。まずはCNIプラグインをビルドします。`Makefile`などはなく、`build_linux.sh`を実行します:
```bash
kazu634@test02% git clone https://github.com/containernetworking/plugins.git
Cloning into 'plugins'...
remote: Enumerating objects: 13094, done.
remote: Counting objects: 100% (1813/1813), done.
remote: Compressing objects: 100% (1125/1125), done.
remote: Total 13094 (delta 780), reused 1431 (delta 621), pack-reused 11281
Receiving objects: 100% (13094/13094), 10.98 MiB | 9.59 MiB/s, done.
Resolving deltas: 100% (6885/6885), done.
kazu634@test02% cd plugins/
kazu634@test02% ./build_linux.sh
Building plugins
bandwidth
firewall
portmap
sbr
tuning
vrf
bridge
host-device
ipvlan
loopback
macvlan
ptp
vlan
dhcp
host-local
static
kazu634@test02% ll bin/
合計 63M
drwxrwxr-x 2 kazu634 kazu634 4.0K 12月 29 12:15 .
drwxrwxr-x 10 kazu634 kazu634 4.0K 12月 29 12:15 ..
-rwxrwxr-x 1 kazu634 kazu634 3.7M 12月 29 12:15 bandwidth
-rwxrwxr-x 1 kazu634 kazu634 4.1M 12月 29 12:15 bridge
-rwxrwxr-x 1 kazu634 kazu634 9.4M 12月 29 12:15 dhcp
-rwxrwxr-x 1 kazu634 kazu634 4.2M 12月 29 12:15 firewall
-rwxrwxr-x 1 kazu634 kazu634 3.7M 12月 29 12:15 host-device
-rwxrwxr-x 1 kazu634 kazu634 3.2M 12月 29 12:15 host-local
-rwxrwxr-x 1 kazu634 kazu634 3.9M 12月 29 12:15 ipvlan
-rwxrwxr-x 1 kazu634 kazu634 3.2M 12月 29 12:15 loopback
-rwxrwxr-x 1 kazu634 kazu634 3.9M 12月 29 12:15 macvlan
-rwxrwxr-x 1 kazu634 kazu634 3.6M 12月 29 12:15 portmap
-rwxrwxr-x 1 kazu634 kazu634 4.0M 12月 29 12:15 ptp
-rwxrwxr-x 1 kazu634 kazu634 3.4M 12月 29 12:15 sbr
-rwxrwxr-x 1 kazu634 kazu634 2.8M 12月 29 12:15 static
-rwxrwxr-x 1 kazu634 kazu634 3.4M 12月 29 12:15 tuning
-rwxrwxr-x 1 kazu634 kazu634 3.8M 12月 29 12:15 vlan
-rwxrwxr-x 1 kazu634 kazu634 3.4M 12月 29 12:15 vrf
```
ビルドしたコマンドを任意のディレクトリに格納します。今回は`/opt/cni/bin`としました:
```bash
kazu634@test02% cd bin/
./ bandwidth* dhcp* host-device* ipvlan* macvlan* ptp* static* vlan*
../ bridge* firewall* host-local* loopback* portmap* sbr* tuning* vrf*
kazu634@test02% sudo chown root:root *
kazu634@test02% ll
合計 63M
drwxrwxr-x 2 kazu634 kazu634 4.0K 12月 29 12:15 .
drwxrwxr-x 10 kazu634 kazu634 4.0K 12月 29 12:15 ..
-rwxrwxr-x 1 root root 3.7M 12月 29 12:15 bandwidth
-rwxrwxr-x 1 root root 4.1M 12月 29 12:15 bridge
-rwxrwxr-x 1 root root 9.4M 12月 29 12:15 dhcp
-rwxrwxr-x 1 root root 4.2M 12月 29 12:15 firewall
-rwxrwxr-x 1 root root 3.7M 12月 29 12:15 host-device
-rwxrwxr-x 1 root root 3.2M 12月 29 12:15 host-local
-rwxrwxr-x 1 root root 3.9M 12月 29 12:15 ipvlan
-rwxrwxr-x 1 root root 3.2M 12月 29 12:15 loopback
-rwxrwxr-x 1 root root 3.9M 12月 29 12:15 macvlan
-rwxrwxr-x 1 root root 3.6M 12月 29 12:15 portmap
-rwxrwxr-x 1 root root 4.0M 12月 29 12:15 ptp
-rwxrwxr-x 1 root root 3.4M 12月 29 12:15 sbr
-rwxrwxr-x 1 root root 2.8M 12月 29 12:15 static
-rwxrwxr-x 1 root root 3.4M 12月 29 12:15 tuning
-rwxrwxr-x 1 root root 3.8M 12月 29 12:15 vlan
-rwxrwxr-x 1 root root 3.4M 12月 29 12:15 vrf
kazu634@test02% sudo mkdir -p /opt/cni/bin/
kazu634@test02% sudo mv * /opt/cni/bin/
kazu634@test02% ll /opt/cni/bin/
合計 63M
drwxr-xr-x 2 root root 4.0K 12月 29 12:18 .
drwxr-xr-x 3 root root 4.0K 12月 29 12:18 ..
-rwxrwxr-x 1 root root 3.7M 12月 29 12:15 bandwidth
-rwxrwxr-x 1 root root 4.1M 12月 29 12:15 bridge
-rwxrwxr-x 1 root root 9.4M 12月 29 12:15 dhcp
-rwxrwxr-x 1 root root 4.2M 12月 29 12:15 firewall
-rwxrwxr-x 1 root root 3.7M 12月 29 12:15 host-device
-rwxrwxr-x 1 root root 3.2M 12月 29 12:15 host-local
-rwxrwxr-x 1 root root 3.9M 12月 29 12:15 ipvlan
-rwxrwxr-x 1 root root 3.2M 12月 29 12:15 loopback
-rwxrwxr-x 1 root root 3.9M 12月 29 12:15 macvlan
-rwxrwxr-x 1 root root 3.6M 12月 29 12:15 portmap
-rwxrwxr-x 1 root root 4.0M 12月 29 12:15 ptp
-rwxrwxr-x 1 root root 3.4M 12月 29 12:15 sbr
-rwxrwxr-x 1 root root 2.8M 12月 29 12:15 static
-rwxrwxr-x 1 root root 3.4M 12月 29 12:15 tuning
-rwxrwxr-x 1 root root 3.8M 12月 29 12:15 vlan
-rwxrwxr-x 1 root root 3.4M 12月 29 12:15 vrf
```
#### CNIプラグインのセットアップ
以下の内容で`/etc/cni/nomad.conflist`というファイル名で保存します。拡張子は必ず`.conflist` にしましょう。`nomad`は拡張子`.conflist`を読み込みます:
```json
{
"cniVersion": "0.3.1",
"name": "nomad",
"plugins": [
{
"type": "ptp",
"ipMasq": true,
"ipam": {
"type": "host-local",
"subnet": "172.16.30.0/24",
"routes": [
{
"dst": "0.0.0.0/0"
}
]
}
},
{
"type": "portmap",
"capabilities": { "portMappings": true }
}
]
}
```
#### NomadからCNIプラグインを利用する
`nomad`の設定ファイルに以下の記述を追加します:
```
client {
enabled = true
cni_path = "/opt/cni/bin"
cni_config_dir = "/etc/cni/"
}
```
### CSIプラグインを動作させるためのnomadの設定
`/etc/nomad.d/csi.hcl`に以下の内容を書き込みます:
```
plugin "docker" {
config {
volumes {
enabled = true
}
allow_privileged = true
}
}
```
設定を反映させるために、`nomad`の再起動を忘れずに。以上の作業を`noamd`サーバ3台で実施します。
### domocratic-csiのControllerの起動
CSIプラグインのまずはControllerを起動させます。ここからは`nomad`のジョブ定義となります。[Nomad Support](https://github.com/democratic-csi/democratic-csi/blob/master/docs/nomad.md)を参考にしていきます。ただ、個々の記述も最新の記述とは言えず、試行錯誤したのはここだけの話。Synology NASで動作させるためには、[democratic-csi/docs/Nomad/examples](https://github.com/democratic-csi/democratic-csi/tree/master/docs/Nomad/examples)も合わせて読む必要がありました。
```
job "storage-controller" {
datacenters = ["dc1"]
type = "service"
group "controller" {
network {
mode = "bridge"
port "grpc" {
static = 9000
to = 9000
}
}
task "controller" {
driver = "docker"
config {
image = "democraticcsi/democratic-csi:latest"
ports = ["grpc"]
args = [
"--csi-version=1.2.0",
"--csi-name=org.democratic-csi.iscsi",
"--driver-config-file=${NOMAD_TASK_DIR}/driver-config-file.yaml",
"--log-level=debug",
"--csi-mode=controller",
"--server-socket=/csi/csi.sock",
"--server-address=0.0.0.0",
"--server-port=9000",
]
}
csi_plugin {
id = "org.democratic-csi.iscsi"
type = "controller"
mount_dir = "/csi"
}
template {
destination = "${NOMAD_TASK_DIR}/driver-config-file.yaml"
data = < 2021-12-29T14:22:33+09:00: Monitoring evaluation "bbb4d4af"
2021-12-29T14:22:33+09:00: Evaluation triggered by job "storage-controller"
==> 2021-12-29T14:22:34+09:00: Monitoring evaluation "bbb4d4af"
2021-12-29T14:22:34+09:00: Evaluation within deployment: "b8269ab5"
2021-12-29T14:22:34+09:00: Allocation "a9500c24" created: node "84bb93d7", group "controller"
2021-12-29T14:22:34+09:00: Evaluation status changed: "pending" -> "complete"
==> 2021-12-29T14:22:34+09:00: Evaluation "bbb4d4af" finished with status "complete"
==> 2021-12-29T14:22:34+09:00: Monitoring deployment "b8269ab5"
✓ Deployment "b8269ab5" successful
2021-12-29T14:23:04+09:00
ID = b8269ab5
Job ID = storage-controller
Job Version = 0
Status = successful
Description = Deployment completed successfully
Deployed
Task Group Desired Placed Healthy Unhealthy Progress Deadline
controller 1 1 1 0 2021-12-29T14:33:02+09:00
kazu634@test02% nomad job status storage-controller
ID = storage-controller
Name = storage-controller
Submit Date = 2021-12-29T14:22:33+09:00
Type = service
Priority = 50
Datacenters = dc1
Namespace = default
Status = running
Periodic = false
Parameterized = false
Summary
Task Group Queued Starting Running Failed Complete Lost
controller 0 0 1 0 0 0
Latest Deployment
ID = b8269ab5
Status = successful
Description = Deployment completed successfully
Deployed
Task Group Desired Placed Healthy Unhealthy Progress Deadline
controller 1 1 1 0 2021-12-29T14:33:02+09:00
Allocations
ID Node ID Task Group Version Desired Status Created Modified
a9500c24 84bb93d7 controller 0 run running 6m44s ago 6m14s ago
```
### domocratic-csiのnodeの起動
CSIの各ノードで動作させるジョブを起動します。ジョブ定義はこんな感じです:
```
job "storage-node" {
datacenters = ["dc1"]
type = "system"
group "node" {
task "node" {
driver = "docker"
env {
CSI_NODE_ID = "${attr.unique.hostname}"
}
config {
image = "democraticcsi/democratic-csi:latest"
args = [
"--csi-version=1.2.0",
"--csi-name=org.democratic-csi.iscsi",
"--driver-config-file=${NOMAD_TASK_DIR}/driver-config-file.yaml",
"--log-level=debug",
"--csi-mode=node",
"--server-socket=/csi/csi.sock",
]
privileged = true
ipc_mode = "host"
network_mode = "host"
mount {
type = "bind"
target = "/host"
source = "/"
readonly = false
}
}
csi_plugin {
id = "org.democratic-csi.iscsi"
type = "node"
mount_dir = "/csi"
}
template {
destination = "${NOMAD_TASK_DIR}/driver-config-file.yaml"
data = < 2021-12-29T14:24:03+09:00: Monitoring evaluation "ed30d050"
2021-12-29T14:24:03+09:00: Evaluation triggered by job "storage-node"
2021-12-29T14:24:03+09:00: Allocation "ee10d0e6" created: node "84bb93d7", group "node"
==> 2021-12-29T14:24:04+09:00: Monitoring evaluation "ed30d050"
2021-12-29T14:24:04+09:00: Evaluation status changed: "pending" -> "complete"
==> 2021-12-29T14:24:04+09:00: Evaluation "ed30d050" finished with status "complete"
kazu634@test02% nomad job status storage-node
ID = storage-node
Name = storage-node
Submit Date = 2021-12-29T14:24:03+09:00
Type = system
Priority = 50
Datacenters = dc1
Namespace = default
Status = running
Periodic = false
Parameterized = false
Summary
Task Group Queued Starting Running Failed Complete Lost
node 0 0 1 0 0 0
Allocations
ID Node ID Task Group Version Desired Status Created Modified
ee10d0e6 84bb93d7 node 0 run running 12m55s ago 12m48s ago
```
## 動作確認
[Stateful Workloads with Container Storage Interface | Nomad - HashiCorp Learn](https://learn.hashicorp.com/tutorials/nomad/stateful-workloads-csi-volumes?in=nomad/stateful-workloads)を参考にして、動作確認をしていきます。
### ストレージの作成
次のようなストレージ定義を作成します:
```
id = "mysql"
name = "mysql"
type = "csi"
plugin_id = "org.democratic-csi.iscsi"
capacity_min = "3GiB"
capacity_max = "5GiB"
capability {
access_mode = "single-node-writer"
attachment_mode = "file-system"
}
mount_options {
}
```
これを`storage-mysql.hcl`として保存し、ストレージを作成します:
```bash
kazu634@test02% nomad volume create storage-mysql.hcl
Created external volume mysql with ID mysql
```
作成したストレージを確認してみます:
```bash
kazu634@test02% nomad volume status
Container Storage Interface
ID Name Plugin ID Schedulable Access Mode
mysql mysql org.democratic-csi.iscsi true
kazu634@test02% nomad volume status mysql
ID = mysql
Name = mysql
External ID = mysql
Plugin ID = org.democratic-csi.iscsi
Provider = org.democratic-csi.iscsi
Version = 1.4.3
Schedulable = true
Controllers Healthy = 1
Controllers Expected = 1
Nodes Healthy = 1
Nodes Expected = 1
Access Mode =
Attachment Mode =
Mount Options =
Namespace = default
Allocations
No allocations placed
```
### テスト用のジョブ実行
次のジョブ定義を作成します。
```hcl
job "mysql-server" {
datacenters = ["dc1"]
type = "service"
group "mysql-server" {
count = 1
volume "mysql" {
type = "csi"
read_only = false
source = "mysql"
attachment_mode = "file-system"
access_mode = "single-node-writer"
per_alloc = false
}
network {
port "db" {
static = 3306
}
}
restart {
attempts = 10
interval = "5m"
delay = "25s"
mode = "delay"
}
task "mysql-server" {
driver = "docker"
volume_mount {
volume = "mysql"
destination = "/srv"
read_only = false
}
env {
MYSQL_ROOT_PASSWORD = "password"
}
config {
image = "hashicorp/mysql-portworx-demo:latest"
args = ["--datadir", "/srv/mysql"]
ports = ["db"]
}
resources {
cpu = 500
memory = 1024
}
service {
name = "mysql-server"
port = "db"
check {
type = "tcp"
interval = "10s"
timeout = "2s"
}
}
}
}
}
```
それではジョブを実行します:
```bash
kazu634@test02% nomad job run mysql.nomad
==> 2021-12-29T14:51:29+09:00: Monitoring evaluation "6278f054"
2021-12-29T14:51:29+09:00: Evaluation triggered by job "mysql-server"
2021-12-29T14:51:29+09:00: Evaluation within deployment: "ecf0f580"
2021-12-29T14:51:29+09:00: Evaluation status changed: "pending" -> "complete"
==> 2021-12-29T14:51:29+09:00: Evaluation "6278f054" finished with status "complete"
==> 2021-12-29T14:51:29+09:00: Monitoring deployment "ecf0f580"
✓ Deployment "ecf0f580" successful
2021-12-29T14:53:29+09:00
ID = ecf0f580
Job ID = mysql-server
Job Version = 0
Status = successful
Description = Deployment completed successfully
Deployed
Task Group Desired Placed Healthy
Unhealthy Progress Deadline
mysql-server 1 4 1 3
2021-12-29T15:03:28+09:00
kazu634@test02% nomad job status mysql-server
ID = mysql-server
Name = mysql-server
Submit Date = 2021-12-29T14:49:15+09:00
Type = service
Priority = 50
Datacenters = dc1
Namespace = default
Status = running
Periodic = false
Parameterized = false
Summary
Task Group Queued Starting Running Failed Complete Lost
mysql-server 0 0 1 3 0 0
Latest Deployment
ID = ecf0f580
Status = successful
Description = Deployment completed successfully
Deployed
Task Group Desired Placed Healthy Unhealthy Progress Deadline
mysql-server 1 4 1 3 2021-12-29T15:03:28+09:00
Allocations
ID Node ID Task Group Version Desired Status Created Modified
8eec5c5c 84bb93d7 mysql-server 0 run running 1m56s ago 1m12s ago
kazu634@test02% nomad alloc status 8eec5c5c
ID = 8eec5c5c-6010-a7e4-c766-951d24de372e
Eval ID = 2f202164
Name = mysql-server.mysql-server[0]
Node ID = 84bb93d7
Node Name = test02
Job ID = mysql-server
Job Version = 0
Client Status = running
Client Description = Tasks are running
Desired Status = run
Desired Description =
Created = 2m8s ago
Modified = 1m24s ago
Deployment ID = ecf0f580
Deployment Health = healthy
Allocation Addresses
Label Dynamic Address
*db yes 192.168.10.82:3306
Task "mysql-server" is "running"
Task Resources
CPU Memory Disk Addresses
4/500 MHz 387 MiB/1.0 GiB 300 MiB
CSI Volumes:
ID Read Only
mysql false
Task Events:
Started At = 2021-12-29T05:53:13Z
Finished At = N/A
Total Restarts = 0
Last Restart = N/A
Recent Events:
Time Type Description
2021-12-29T14:53:13+09:00 Started Task started by client
2021-12-29T14:52:49+09:00 Driver Downloading image
2021-12-29T14:52:49+09:00 Task Setup Building Task Directory
2021-12-29T14:52:45+09:00 Received Task received by client
kazu634@test02% nomad volume status mysql
ID = mysql
Name = mysql
External ID = mysql
Plugin ID = org.democratic-csi.iscsi
Provider = org.democratic-csi.iscsi
Version = 1.4.3
Schedulable = true
Controllers Healthy = 1
Controllers Expected = 1
Nodes Healthy = 1
Nodes Expected = 1
Access Mode = single-node-writer
Attachment Mode = file-system
Mount Options =
Namespace = default
Allocations
ID Node ID Task Group Version Desir
ed Status Created Modified
8eec5c5c-6010-a7e4-c766-951d24de372e 84bb93d7-df8f-7376-3247-88e01498f1a9 mysql-server 0 run
running 2m19s ago 1m35s ago
```
うまく起動しない場合は、`/etc/iscsi/nodes/`配下を全て削除して、再度ジョブを実行してください。
うまく起動できたら、初期データの確認とデータの書き込みをします:
```bash
kazu634@test02% mysql -h 192.168.10.82 -u web -p -D i
temcollection
Enter password:
Reading table information for completion of table and column names
You can turn off this feature to get a quicker startup with -A
Welcome to the MySQL monitor. Commands end with ; or \g.
Your MySQL connection id is 50
Server version: 8.0.15 MySQL Community Server - GPL
Copyright (c) 2000, 2021, Oracle and/or its affiliates.
Oracle is a registered trademark of Oracle Corporation and/or its
affiliates. Other names may be trademarks of their respective
owners.
Type 'help;' or '\h' for help. Type '\c' to clear the current input statement.
mysql> show tables;
+--------------------------+
| Tables_in_itemcollection |
+--------------------------+
| items |
+--------------------------+
1 row in set (0.00 sec)
mysql> select * from items;
+----+----------+
| id | name |
+----+----------+
| 1 | bike |
| 2 | baseball |
| 3 | chair |
+----+----------+
3 rows in set (0.00 sec)
mysql> INSERT INTO items (name) VALUES ('glove');
Query OK, 1 row affected (0.03 sec)
mysql> select * from items;
+----+----------+
| id | name |
+----+----------+
| 1 | bike |
| 2 | baseball |
| 3 | chair |
| 4 | glove |
+----+----------+
4 rows in set (0.00 sec)
mysql> INSERT INTO items (name) VALUES ('hat');
Query OK, 1 row affected (0.01 sec)
mysql> INSERT INTO items (name) VALUES ('keyboard')
Query OK, 1 row affected (0.00 sec)
mysql> exit
Bye
```
ここでこのジョブを停止してみます:
```bash
kazu634@test02% nomad job stop -purge mysql-server
==> 2021-12-29T15:04:01+09:00: Monitoring evaluation "c30547e6"
2021-12-29T15:04:01+09:00: Evaluation triggered by job "mysql-server"
==> 2021-12-29T15:04:02+09:00: Monitoring evaluation "c30547e6"
2021-12-29T15:04:02+09:00: Evaluation within deployment: "ecf0f580"
2021-12-29T15:04:02+09:00: Evaluation status changed: "pending" -> "complete"
==> 2021-12-29T15:04:02+09:00: Evaluation "c30547e6" finished with status "complete"
==> 2021-12-29T15:04:02+09:00: Monitoring deployment "ecf0f580"
✓ Deployment "ecf0f580" successful
2021-12-29T15:04:02+09:00
ID = ecf0f580
Job ID = mysql-server
Job Version = 0
Status = successful
Description = Deployment completed successfully
Deployed
Task Group Desired Placed Healthy
Unhealthy Progress Deadline
mysql-server 1 4 1 3
2021-12-29T15:03:28+09:00
kazu634@test02% nomad job status mysql-server
No job(s) with prefix or id "mysql-server" found
```
再度このジョブを起動します:
```bash
kazu634@test02% nomad job run mysql.nomad
==> 2021-12-29T15:04:17+09:00: Monitoring evaluation "76147cde"
2021-12-29T15:04:17+09:00: Evaluation triggered by job "mysql-server"
2021-12-29T15:04:17+09:00: Allocation "ba132b91" created: node "84bb93d7", group "mysql-server"
==> 2021-12-29T15:04:18+09:00: Monitoring evaluation "76147cde"
2021-12-29T15:04:18+09:00: Evaluation within deployment: "2b5617ef"
2021-12-29T15:04:18+09:00: Evaluation status changed: "pending" -> "complete"
==> 2021-12-29T15:04:18+09:00: Evaluation "76147cde" finished with status "complete"
==> 2021-12-29T15:04:18+09:00: Monitoring deployment "2b5617ef"
✓ Deployment "2b5617ef" successful
2021-12-29T15:04:45+09:00
ID = 2b5617ef
Job ID = mysql-server
Job Version = 0
Status = successful
Description = Deployment completed successfully
Deployed
Task Group Desired Placed Healthy
Unhealthy Progress Deadline
mysql-server 1 1 1 0
2021-12-29T15:14:44+09:00
```
再度、`mysql`に接続すると、データが永続化されていることがわかります (`glove`, `hat`, `keyboard`が存在します):
```
kazu634@test02% mysql -h 192.168.10.82 -u web -p -D itemcollection
Enter password:
Reading table information for completion of table and column names
You can turn off this feature to get a quicker startup with -A
Welcome to the MySQL monitor. Commands end with ; or \g.
Your MySQL connection id is 11
Server version: 8.0.15 MySQL Community Server - GPL
Copyright (c) 2000, 2021, Oracle and/or its affiliates.
Oracle is a registered trademark of Oracle Corporation and/or its
affiliates. Other names may be trademarks of their respective
owners.
Type 'help;' or '\h' for help. Type '\c' to clear the current input statement.
mysql> select * from items;
+----+----------+
| id | name |
+----+----------+
| 1 | bike |
| 2 | baseball |
| 3 | chair |
| 4 | glove |
| 5 | hat |
| 6 | keyboard |
+----+----------+
6 rows in set (0.00 sec)
```
### 後片付け
以下、実行ください:
- `nomad job stop -purge mysql-server`
- `nomad volume delete mysql`
## 参考リンク
- [democratic-csi](https://github.com/democratic-csi/democratic-csi)
- [GitHub - containernetworking/plugins: Some reference and example networking plugins, maintained by the CNI team.](https://github.com/containernetworking/plugins)
- [Ubuntuでopen-iscsi(2.0.874 @raspberry pi 4 / ubuntu 20.04)](https://zenn.dev/hinoaki/articles/98e5122d5e61f3757a9d)
- [Ubuntu Linux 20.04 LTSに、Goをインストールする(+Emacs lsp-mode) - CLOVER🍀](https://kazuhira-r.hatenablog.com/entry/2020/12/19/010344)
- [Stateful Workloads with Container Storage Interface | Nomad - HashiCorp Learn](https://learn.hashicorp.com/tutorials/nomad/stateful-workloads-csi-volumes?in=nomad/stateful-workloads)
- [kubernetesで活用しているCNI PluginのIPAM動作を試す - Qiita](https://qiita.com/ttsubo/items/877641bcd0b937cb65ad)
- [network Stanza - Job Specification | Nomad by HashiCorp](https://www.nomadproject.io/docs/job-specification/network)